Thursday, September 29, 2011

Vote for your Favorite Retro Pillow!

Are you here to vote for your favorite retro pillow?  Scroll down past these lovely photos and you'll find the ballot.  Voting begins October 1st.  Anyone may cast one vote per day until October 31st.  

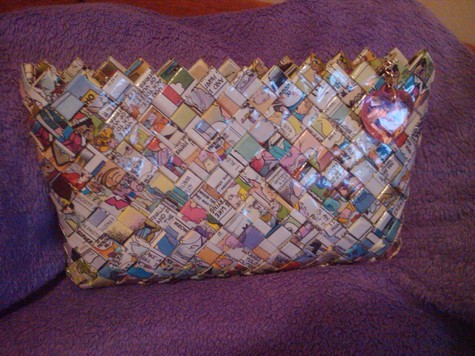
I can't tell you how much Keren from sew la vie and I have enjoyed organizing the Retro Pillow Challenge.  It was a lot of hard work for two beginning bloggers living on different continents, but we pulled it off, didn't we?  You can learn more about our partnership here.  The most amazing part for me was how differently each participant tackled the challenge.  Just look at all these amazing pillows!  Be sure to click on the link under each photo to find out more about how the pillow was created and to see more photos.  


[learn more about Adrianne's pillow]
[learn more about Becky's pillow}
[learn more about June's pillow]
[learn more about Kadie's pillow]
[learn more about Kasia's pillow]
[learn more about Kate's pillow]
[learn more about Keren's pillow]
[learn more about Lakshmi's pillow]
[learn more about Pam's pillow]
[learn more about Rikka's pillow]
[learn more about Amy's pillow]

[learn more about Emily's pillow]

Gorgeous, aren't they?  The winner will receive bragging rights and super cool badge.  Remember, one vote per day during the entire month of October.


vote for your favorite pillow


After you vote, head on over and sign up for our next sewing challenge:

Tuesday, September 27, 2011

My Retro Pillow is Done!


This has been a busy month for me with the kids going back to school, a bathroom remodel, 7 fish purses to sew, 2 weddings, a 10 year anniversary to celebrate, painting the kids' bedrooms, and prepping for a visit from my lovely in-laws.  And to top it all off, I had to create a pillow cover for the Retro Pillow Challenge!  Honestly, the pillow challenge has been my favorite task this month.  Keren and I are eager to come up with a new challenge for November.  Any suggestions as to a theme or project? 


So here it is, my retro pillow.  I've never done patchwork before and I'm proud of how my squares lined up perfectly.  I've never quilted before and I'm eager to try making some quilted tote bags in the future.  This project went pretty smoothly and, all in all, didn't take much time to complete--all together maybe 4-5 hours.  I feel like most of that time went towards choosing the fabrics!


Here's the finished pillow front.  I washed it to fluff up the quilting and fray the raw edges.  I'm thinking those green squares with the red circles in side are looking like olives!  The challenge guidelines called for the use of rectangles with rounded corners or circles.  I figured I better have all my bases covered! 


Flip over my pillow front and you can see my machine quilting.  I only quilted along the seams.


A closer look at how I put together each square. 
  1. I stacked the 3 layers of fabric. 
  2. I stitched the square and the circle. 
  3. Around the square, I cut off the top 2 layers of fabric. 
  4. Inside the circle, I cut off the top layer of fabric. 
  5. I sewed the completed squares together to form the pillow front. 
  6. I made a sandwich of my pillow front, some batting and large piece of backing fabric. 
  7. I used a decorative machine stitch to quilt around all the squares and circles. 
  8. I used a straight stitch to quilt along all the patchwork squares. 
  9. Then I sewed on the envelope style back.  Easy-peasy!


Lucy the Cat certainly loves her new pillow!  Stay tuned for the voting portion of this challenge coming up in October.

As Always, happy crafting and big hugs from Montana!

check out all the other pillows:

Monday, September 26, 2011

Wedding Weekend

My cousin got hitched last weekend and it was a grand time!

Sarah and Jen are twins with big sister, Krystal.
Aren't they absolutely lovely?

This was a fishing themed wedding.  Yes, fishing!  The bride and groom are avid fisher persons and lovers of all outdoor sports and pastimes.  Check out the centerpieces.  A fishing bobber holding a photo of the couple suspended in water. 


Jen asked me to sew some little bags for the bridal party and I initially came up with this:

find the tutorial here

However, I changed my mind.  I wanted to play off the fishing theme as well.  How often does one get the chance to make fish purses?  Not often enough, I say!  So this is what I came up with instead:


It's a simple lined pouch with a zipper down the spine.  The little strap is attached to the zipper pull.  The fabric is a crushed velvet with a bit of embroidery and fish-scale-like clear sequins. 

The total bummer about these little purses is that I forgot to take pics of them.  I had big plans to string them all (seven in total) up across my fence and take a "group" photo.  But, I sent them off before I could do that.  Still kicking myself! 

Then, I thought that maybe I could get a pic of all the bridesmaids holding their fish purses.  Well, honestly, I couldn't bring myself to ask them.  They were busy with all the professional photos before the wedding and busy with all the reception stuff after the wedding.  Everyone was asking them to take this photo and that photo, to dance with this uncle and that cousin.  I didn't want to add to their duties.  So, lesson learned.  :(  Next time I won't forget!

Cousin Jen had her wedding on Friday, and the next day my cousin Larry and his new bride had a reception (they were married in Las Vegas).  Yet another fun time with family!


All this talk of weddings has me thinking about me and Mr. Ricochet.  Here we are on our way to go out and listen to some jazz.  This photo was taken 10 years after the day we met.


Happy crafty and big hugs from Montana!

Itchy Sweater to Cute Purse Tutorial

This post was shown originally on Creating my way to Successs!
It is my first guest posting job and I loved it!
I hope you do too!

Here it is!  I didn't change a thing.
        Happy Friday!  My name is Rikka J. and I'm here from Ricochet and Away!  It's a crafty blog with a focus on sewing bags.  Creating my way to Success has been my go-to location for blogging tips, Round Tuit linky parties, and sewing tutorials so it is quite the honor to be guest posting for Jill today.  You can get to know me better by checking out some of my favorite tutorials:
Up-cycle an Old Wallet
In recognition of Jill's passion for up-cycling and re-fashioning clothing, I am sharing a great wool purse tutorial.  Enjoy!

Look for a thrift store sweater
with a 100% wool label.
Hello sweater season!  I created this chic little purse way back in July and have been sitting on it until now.  Summer time is not the right time to unleash a gorgeous felted wool handbag, but you don't know how hard it was for me to wait!  Because I like you so much, I even threw in a quickie bonus tutorial!  Yes, my faithful and first time readers, you get 2 tutes in one today!  Tell your friends!  Pass it on!  If you can wash clothes, use scissors, and sew a straight stitch on your machine----you can do this!

Supplies you'll need to get started: 
an itchy 100% wool sweater
washing machine and detergent
dryer
scissors
chalk to mark sweater
sewing machine with coordinating thread
Optional: magnetic clasp
Attention: click on any image to view it full-sized
First step is to "felt" your wool sweater. To do this, you must do what you are never supposed to do with a wool sweater: Wash it in your machine in hot water (with a little soap) and dry it in your dryer. (warning: be prepared for lots of lint!) The agitation of your washing machine is crucial. Please don't assume you can soak your sweater in hot water and cause felting. You could also throw in some jeans and set your machine to "extra-dirty-extra-long-cycle" to make sure the sweater is really agitated and rubbed around. That will cause the fibers in the wool to get all matted down. What once was knitted yarn will become a dense, rich felt, like magic!
How do you know your sweater is felted properly? Answer: you will be able to cut it and no unravelling or running will occur. You may have to wash and dry 2-5 times to achieve your desired degree of felting. I washed the sweater I used in this tute 3 times causing it shrink nearly 25% smaller. I could have washed it more times to create a denser, thicker felt to work with, but I was running out of square inches didn't want a teeny-tiny purse.
Bonus Tutorial! Click on image to enlarge.
Are you ready for your bonus tutorial? Well look at the pic above! Hello easy-peasy no-sew fingerless gloves! Wear 'em pulled up or scrunched down. Embellish 'em with buttons, fabric flowers, lace, ruffles. You get the idea! Have fun and be sure to tell me all about it. (side note: It is really hard to take decent pictures of your own arm!)
The next step is to cut an opening into the sweater to create the handles. I used the lid to the oatmeal to trace a circle, but I think a half circle or oval would look great as well. I traced the circle, cut it out, and then traced the hole onto the other side of the sweater and cut it out as well. Next step is to trim off the neck. I trimmed it off in a gentle curve to create the top of my bag.
Now, if your sweater is a v-neck, you may run into trouble here. Be sure to cut your first hole below the "v" and line up the hole on the other side with it. If your v-neck is too low to make this work, you can always cut out a u-shape and sew together the tops of the "u" to create handles OR just round off the top and use something else for handles.
This step is optional, but I like the way it finishes and reinforces the handles. What you want to do is fold over the top edge of the handle towards the inside of the bag and stitch it in place. To ease the top edge around the curve, cut a few v-shaped notches into the top edge. I did 3 notches with a 1.5" gap. When I pinned the edge down, I scrunched together the notches. I sewed it down with a double row of straight stitches. You don't have to do the notches either. Instead, you could fold in a little pleat or two if your felt isn't too thick. 
Note: increase your stitch length when sewing through thick felt.
Adding a magnetic clasp is optional as well, but here's how I did it: I cut two squares of grey vinyl (any stiff fabric will work) and attached the clasps (one male, one female) to them. Then I sewed the patches of vinyl to the insides of the bag. I had to do this twice because the first time I sewed them off-center. So be careful! The final step is to turn your bag inside out and pin and stitch the bottom edge closed. I sewed mine straight across, but I think rounded corners would look nice too.


Now that the functional part of your purse is complete, it's time for you to decorate!  I used my die cutter on the scraps of sweater left over to cut out several flowers.  Then I used some leather studs to attach them to the purse.  The options are endless. . . you can do whatever you want!  Fabric yo-yos, buttons, zipper roses, felt flowers, lace, ruffles, etc.  Felt is sometimes difficult to push a needle through, so locate a thimble if the hand sewing gets tough.  Have fun and be sure to share your results with me!  Email a pic to ricochethandbags@hotmail.com and I'll post it on my blog. 
Happy crafting,
P.S.  I'm co-hosting the Retro Pillow Challenge!  Please click this button and check it out!


linking this post to these great parties:

Thursday, September 22, 2011

don't touch that dial!

I'm going out of town for a few days but wanted to leave you all with an idea of what's in the works for Ricochet and Away!

The Retro Pillow Challenge is ending Sept. 30th and
voting begins in October.

This is the gaudy dress I bought on sale to wear to
my dear cousin's wedding.  I assure you, it looks better
"on".  I also picked up this purple thrift store purse
and decorated it with a suede flower.  I'm going to make a little
tutorial on making flowers out of suede.

I've been referring to my die cutter a lot, but
haven't went into details about all the cool things you can do with it.
So, I'm working on a series of die-cutting projects and techniques.


I've been making fish purses lately and wanted to share
the story behind their conception.  Plus, I have a few tips on making your own
wacky-shaped zippered pouches.

As always, happy crafting and big hugs from Montana,

Sunday, September 18, 2011

Kristy's Farewell Gift...

Find the tutorial for this purse here.

Alas, my good friend Kristy has moved away.  :*(  We have many states between us now, but thanks to cell phones and facebook we can still bug each other throughout the day!  Kristy has many virtuous qualities that I appreciate dearly, but in one aspect, she is my "crafty-enabler-friend".  She got me hooked on die-cutting and card-making, 2 things that bring me so much satisfaction!  Kristy always has an extra craft store coupon to share, and she sends me links to the coolest crafty shopping sites.  Kristy has been a Stampin' Up demonstrator for a while now, so when I received an extra Stampin' Up catalog in the mail last month, I knew exactly what I wanted to do with it. 

I have been fooling around with paper weaving for the last few months and really wanted to figure out how to make a purse using this technique.   I was inspired by this fab purse made out of the Sunday funnies that I saw on BurdaStyle:

Comic_book_clutch_purse_large
[source]

And then I found this tutorial on how to weave a paper basket:


flashback-map-figG.jpg
[source]

And then I made these little guys:


They turned out cylinder-shaped, which is OK if you're making beer cozies and pencil cups.  However, I wanted a purse.  I needed something decidedly not cylinder-ish, but more envelope-like.  So instead of looking up another tutorial online, I decided to figure it out on my own.  I had a few paper cozies under my belt, so a wider-flatter shape shouldn't be too hard, right?  Wrong.  The shape I desire still eludes me, but I did happen upon this very peculiar shape instead:


What would you call this shape?  It's kind of like a 3-D hexagon with the top cut off.  But whatever you call it, I feel it made cute little conversation-piece handbag.  I made it out of the Stampin' Up mailer catalog to personalize it for Kristy.  I gave it a few coats of Mod Podge to toughen it up a bit.  The red alligator is from a thrifted purse.  I attached the flap and handle with leather studs. 


I'm happy with the finished product as is Miss Kristy.  If you would like to try some paper weaving, I have made a tutorial for the weaving portion of this purse here.  You will also find there other links to more paper weaving tutorials I've encountered on the web. 

If you haven't already, please check out the Retro Pillow Challenge:


As always, happy crafting and big hugs from Montana,


linking up at many of these cool parties:
http://debbie-debbiedoos.blogspot.com/
http://www.skiptomylou.org/
http://www.creatingreallyawesomefreethings.com/
http://craftomaniac.blogspot.com/
http://thediyshowoff.blogspot.com/
http://makingtheworldcuter.com/
http://sewcando.blogspot.com/
http://sumossweetstuff.blogspot.com/
http://craftskeepmesane.blogspot.com/
http://betweennapsontheporch.blogspot.com/
http://madincrafts.blogspot.com/
http://becolorful.typepad.com/becolorful/
http://soverycreative.blogspot.com/
http://sewchatty.blogspot.com/
http://jembellish.blogspot.com/
http://pinkapotamus.blogspot.com/
http://www.pollywantacrafter.com/
http://coloursdekor.blogspot.com/
http://embellishinglifeeveryday.blogspot.com
http://www.dittledattle.blogspot.com/
http://rtheyallyours.blogspot.com/
http://diyhshp.blogspot.com/
http://sewhappygeek.co.uk/
http://allthingsfee.blogspot.com/
http://singingthreelittlebirds.blogspot.com/
http://bluebirdsews.blogspot.com/p/eat-grow-sew.html
http://www.thegirlcreative.com/
http://www.beneaththerowantree.blogspot.com/
http://ppp-makeitmonday.blogspot.com/
Related Posts Plugin for WordPress, Blogger...