Saturday, December 17, 2011

Coloring Book Organizer for the Car


In preparation for our trip to Texas, I've sewn some  fabric mazes and 2 simple bags to hold some coloring books and snacks for the kids.  I was very pleased with the bags so I wanted to share a tutorial with all of you. This is a VERY SIMPLE sewing project that can be completed in around 30 minutes.

Many of the back-of-the-seat organizers I've seen required lots of fusible interfacing, bias tape and nylon straps and all sorts of clips and various hardware.  I needed something much simpler and quicker to make.  So, I started with 2 fat quarters and worked from there.  

I found some a length of cord-like stuff that I picked up at a thrift store.  It consists of a thick cotton string covered in a tube of pastel-colored fabric.  I bought it with the intention of making some fat piping.  I haven't a clue about it's original purpose.  However, any type of nylon cording, twine, thicker string, shoe laces, bias tape, etc. would do the job.  I placed the cording at the top to tie the organizer to the head rest.  Another length of cord ties around the back of the seat to keep it from swinging.  I later fastened the cord to an arm rest on one side and a metal bar under the seat on the other.  


Supplies:
2 fat quarters (a fat quarter is 18 X 21 inches of fabric)
Thread, iron, scissors, ruler, and sewing machine
1-2 yards of cording (or whatever you have on hand)

7 Easy Steps:
  1. With your fat quarters pinned right sides together, sew around the perimeter using a 0.5 inches seam allowance.  Leave a 2 inch opening in the seam.  Clip the corners.
  2. Turn the fabric right side out, pulling through the opening.  Press flat.
  3. Now you have a nice two-sided rectangle of fabric with all the raw edges neatly tucked away.  Fold the rectangle bringing one 17 inch edge within 3-5 inches of the opposite edge.  The distance will determine how deep the pocket will be.  Press flat.
  4. Top-stitch around the sides and top, leaving the fold unstitched.  Begin and end your top-stitching 0.5 inches from the fold.
  5. Thread your cording through the openings in the top-stitching.  Tuck your cording against the inside of your fold and stitch right along the cording, creating a channel for the cording.  This is a lot easier than sewing the channel first and threading the cord later.
  6. Sew 2 button holes 5 inches apart and centered near the top edge of the fabric.  Thread another length of cording through the button holes.  Eyelets would also be a good choice.
  7. A 17 inch wide pocket will only sag open.  See the photo below.  Stitch through all the fabric 4 inches from one side to create a 4 inch and a 13 inch wide pocket.  The 4 inch wide pocket will probably be too deep and narrow to utilize, so make it shallower with a line of stitching.


A too wide pocket will sag open and be in the way.

Now the sagging is gone and everything looks neat and tidy.

Little sister needed one as well.

Happy crafting and big hugs from Montana,

Friday, December 16, 2011

Maze game for long car rides


We are going south for Christmas this year.  My lovely in-laws live in Texas, so we're driving down to visit for a couple weeks.  Yes, driving.  The drive from MT to TX will take us 2 1/2 days.  That's a lot of time in the car for my 5 and 7 y.o. kids.  I've been brainstorming on ways to make the time in the car more tolerable for everyone.

I was looking for quiet yet engaging activities my kids could do in the car when I ran across this pinterest pin:

                                                 Source: servingpinklemonade.blogspot.com via Rikka @ Ricochet and Away! on Pinterest

The idea behind these little guys is that a marble is inserted inside the pouch.  Your kids can then push the marble through the path or maze that was top-stitched on the pouch.  The results:  a quiet interactive toy you can whip out of your purse at a moment's notice.  Cool, eh?  The original post is by Jeanine and Amy of Serving Pink Lemonade can be found HERE.  There entire blog is a real treat for parents of young children, filled with all sorts of cool kid-friendly projects.  Please check it out and show them some love.

I made a bigger, more complicated version of their maze game in hopes that it will occupy my kids' minds that much longer.  Fingers crossed!  Here's how I did it:

Supplies:
  • A rectangle of fabric.  I used a medium weight cotton measuring 12" by 20".
  • Tear away stabilizer.  I used Sulky Totally Stable Iron-On Tear Away.
  • A marble.  I used a plastic marble from my kids' Hungry Hippo game.  
  • Basic sewing supplies: sewing machine, thread, iron, scissors, etc.

1. 
I folded my rectangle of fabric in half, right sides together.  I ironed the fold.
2. 
I stitched around the outer perimeter using a 1cm seam allowance and leaving a 5cm opening in the seam.  I trimmed the corners off and carefully turned it using the hole in the side seam.  I ironed it flat.


3.  
I cut out a piece of tear-away stabilizer to fit over the fabric.  I had to overlap two pieces in order to make it large enough.
4.  
I drew a 1 inch grid on the stabilizer and used it to draw a maze.


5.  
I ironed the maze drawing onto the fabric and stitched over every line.
6. 
 I removed the stabilizer.


7. 
 I inserted the marble into the side opening and top-stitched around the outer edge of the fabric.  Then I restitched over all the maze lines to ensure they were nice and secure.
8.  
I added the letters of my children's names and some stars with a permanent marker.


Ricochet's Maze Game Rules:


Variation A:
Simply move the marble from one star to the next.  Count Mississippi's until the circuit has been completed.  Play again and try to beat your previous Mississippi count.

Variation B:
Starting at the first letter of your first name, move the marble through the maze, spelling out you first and last names.  Try it again with your sibling's name.  Try it again spelling any words you can come up with using the letters on hand.

Variation C:
Flip over the maze, hiding the letters and stars.  Pretend your marble is mouse searching for food.  Make sure your mouse searches every nook and cranny for food.

Hopefully I can come up with some more games and create a couple more mazes for them to play with before we leave.  Fingers crossed that this will make our long drive more bearable!


Happy Crafting and big hugs from Montana,

Wednesday, December 14, 2011

Montana made national news!

It's nice to see Montana in the news for something besides a natural disaster or extreme weather or the Uni-bomber.

Please enjoy this little news clip about a small Montanan town not too far from where I live.

(I'm sorry to say there will most likely be 15 seconds of advertising before the clip begins.  Please don't let that discourage you from watching the entire video.)


Warm wishes,

Monday, December 12, 2011

Sneak Peaks

I'll be way down in Texas for Christmas and New Years so I've been prepping for our long journey.  One of the things I hope will keep the kids occupied is this fabric maze I sewed:

And I've come up with another little project to make our trip a little easier:

As my special Christmas gift to blogland crafters around the world, I've scheduled 3 posts (all for Dec. 20th) about the Tudor Rose purses I've been making:
One introduction post showing a little gallery of the recent Tudor Rose I made, another giving you a brief history of the Tudor Rose badge and what it means to England, and the last post will be a tutorial.

You can also look forward to another tutorial on how to make a simple zippered pouch:


While I'm away, I want you to be sure to vote for your favorite entry into the Solids-Only Tote Challenge.  Plus, I wish you would consider signing up for our Naughty Notions Challenge which takes place in January.

Happy crafting and big hugs from Montana (and even bigger hugs from Texas!),

Thursday, December 8, 2011

Naughty Notions: January's Challenge!


Yay for another sewing challenge!

This time we're focusing on notions.  All the snaps and buttons, the lace and ribbon, the piping and cords, the beads and bias tape that are taking over our craft rooms need to go!  We treasure those bits and baubles and tell ourselves we'll use them someday.  Well my friends, that day has come!  We want you to sew a simple little clutch or handbag and just go crazy embellishing it with notions.  Here's your chance to learn how to install and eyelet or turn a corner with bias tape.  You can challenge yourself to make a considerable dent in your button collection or find a noble use for all those snips of lace you've been holding on to.  Sounds like fun, right?

You can sign up and/or read about all the details at the homepage HERE.

Also, there is still lots of opportunities left to vote for your favorite tote HERE.

Is this the first you've heard about our sewing challenges?  For shame!

  • You can see the entries from The Retro Pillow Challenge right HERE.
  • All the totes from the Solids-Only Tote Challenge are HERE.


Happy crafting and big hugs from Montana,

Thursday, December 1, 2011

Craftgawker, oh how I loath thee!

craftgawker  
vs.
RicochetandAway!

Have you heard about Craftgawker?  You can submit a photo, and if it's approved, your photo will show up on the site and link back to a corresponding blog post.  I thought it would be an easy way to get the word out about Ricochet and Away.  Well, I was wrong about the easy part.  After 30+  attempts, I have managed to get 3 photos accepted.  Not great odds.  I know.

I have developed a serious love/hate relationship with Craftgawker, which in turn has created a serious love/hate relationship with both my camera and my digital photo editing program.  I'm a wreck.  Well, maybe not a wreck, but I'm definitely spending an inordinate time with this whole Craftgawker thing.  To make matters worse, now I'm even posting about Craftgawker!!!

Like I said, I was able to get 3 photos accepted onto the site:


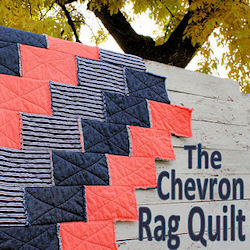
Chevron Rag Quilt
Purse with Metal Frame Tutorial

Craftgawker asks that you submit high quality digital photos that are 250 X 250 pixels in size.  If your photo is deemed unworthy, Craftgawker sends you an email telling the reason(s) why the photo didn't make the cut.  That's a infuriating nice feature.  I often try to fix the problems and re-submit.   More often than not, that doesn't work.

One time I was certain there was absolutely nothing wrong with the photo I submitted.  So I simply waited 8 hours and resubmitted the exact same photo, thinking that the next photo-judger on shift would not be so aesthetically-challenged.  That brilliant plan didn't work in my favor.  *sigh*

The main reasons they gave for my photos not being up to par are as follows:
  • Harsh lighting and/or overexposed
  • Lighting issues - dull/unsharp
  • composition - too tight and cluttered
  • grainy image - may be overly sharped in photoshop
  • Low lighting and/or underexposed
  • Lighting/exposure issues
  • lighting/shadow issues
You see the trend?  Yep, I got a lot of lighting and exposure issues.  

Here's a big graveyard of photos that didn't make the Craftgawker cut:
 And in no particular 
order, here are the rejects>> 


Rather than continue with the bitching and complaining, I'd like to finish this post with some good information and positive inspiration.  No one likes a whiner, right?  Here are some of things I've learned.  I hope you'll find some of this helpful.
  1. No amount of digital photo editing will fix a photo that was poorly shot in the first place.  I can fiddle with exposure and contrast and sharpness all I want, but I just produce photos that look over-edited.
  2. My best photos were taken outdoors on overcast days.  Natural light is best and the flash is not my friend.
  3. My original photos need to be smaller to begin with.  I.e. shrinking a 3888x2592 pixel photo down to a 250x250 pixel photo will not produce as good of results as shrinking a 1936x1288 pixel photo down to 250x250 pixels.  This is where all my dull/not-sharp/unfocused issues sprang from.
  4. Some photos won't crop down to perfect squares.  A good example are the photos I took of my daughter's pink quilt.  My best photos from that shoot didn't look right when I cropped them down into squares.  I wasn't taking those photos with appeasing Craftgawker in mind.  The results were none of photos could be cropped to show the whole quilt and Craftgawker labeled my submissions as being too tightly composed.
  5. Include a nice square photo in every blog post.  Craftgawker requires the photo you submit to be found in the corresponding blog post or it is automatically denied.  Plus, it's nice to have a good square-shaped photo for linky parties as well.  Two birds.  One stone.  
  6. The results are worth the effort.  For my little blog, I usually get +/- 200 daily pageviews.  When I have a photo up on Craftgawker, I jump up to over 1000 daily pageviews for several days.  The numbers taper down slowly as my photo moves further back in the que, but they never go away completely.  
Thanks for taking the time to read through this post!  Please let me know if you've had similar frustrations with Craftgawker, as I'd love to have someone to commiserate with!  I'm also interested in any good photography tips you may have or good links you've ran across.

Happy crafting and bug hugs from Montana,
p.s.  Don't forget to vote for your favorite tote from the Solids-Only Tote Challenge.  There are 18 wonderful totes to choose from made by creative bloggers from all over the world.  Anyone can vote once a day until December 31st.  You can find the poll HERE.
Related Posts Plugin for WordPress, Blogger...