Showing posts with label tutorial. Show all posts

Wednesday, April 3, 2013

Vote: Fancy Feet Sewing Challenge


March's challenge asked the participants to learn how to use a new foot on their sewing machines.  I tried to master my rolled hem foot without very much success.  You can read about my own foot misadventures HERE.

A total of 10 participants were able to meet the challenge by creating finished projects using their new and/or fancy feet.  It's not always easy to meet a challenge and fulfill a commitment, but 10 of you did and I think that's just so incredibly awesome!!!  Thanks so much for all of your hard work and dedication.  All of the challenge entries are so creative and inspiring.  Please scroll down and follow the links to all the projects.

After the list of projects is a just-for-fun poll to vote for your top 3 entries.  Anyone can vote once per day throughout April.  The entries receiving the most votes are awarded with bragging rights and nifty badges for their blogs.


Visit Desert Designs!

Linda used her bias binding foot when she turned this men's shirt into a cute apron.
Please visit her website and see all her beautiful smocking skills HERE.


Visit pritty tings!

Kristin used her free motion quilting foot to quilt this baby blanket.
Read about her experience HERE.
Here tutorial page can be found HERE.

Visit Skaberlyst!

front
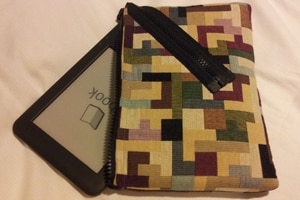
Signe used a piping foot to install the zipper in this e-reader pouch.
Find out how she did it HERE.
Locate more of her sewing tutorials HERE.


Visit Celtic Thistle Stitches!

Challenge Wash Bag
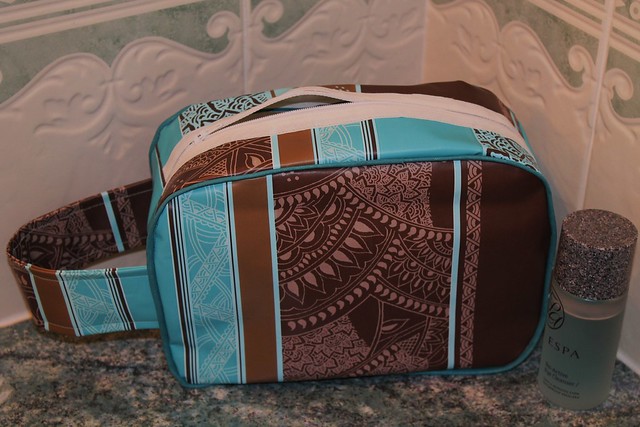
Celtic Thistle made this oilcloth toiletry bag using a teflon foot, a piping foot, and her zipper foot.
She blogged about it HERE.
Find her sewing tutorials page HERE.


Visit Threading My Way!

Pam used her roll and shell hemmer foot to hem the ruffles on this nappy cover.
She blogged about her project HERE.
Pam has lots of sewing tutorials to be found HERE.

Visit Raspberry Sunshine

photo 4
Cindy used her ribbon/sequin foot to attach the lace to this zippered bag.
Read her blog post about this project HERE.
Visit her etsy shop HERE.

Visit Suzie Stitches!

Suzie used her buttonhole foot to sew a bunch of cute bunny pouches.
Read her post about them HERE.
Scroll through her blog archives, and you'll find she has sewn a wide variety of things.

Visit The Hobby Harbor!

Burdastyle JJ Blouse
Diya used her gathering foot to add the ruffles to her pretty blouse.
She blogged about her challenge HERE.
Find Diya's tutorial page HERE.

Visit Passion et Couture!

Marisa used her pintucking foot to create this beautiful table runner.
She blogged about her project HERE.
Find more of her tutorials HERE.

Visit Play Sculpt Live!

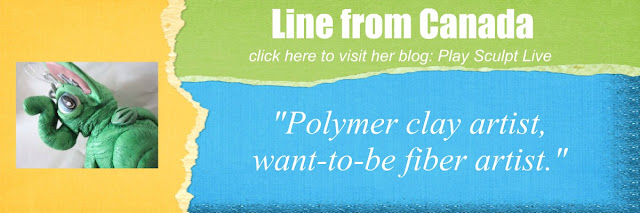
Line used her new teflon foot to sew this roomy oilcloth beach tote.
She blogged about it HERE.
Check out an online album of her work HERE.


Happy crafting and big hugs from Montana,

Sunday, March 24, 2013

I Painted My Vinyl Floor


Can you  paint a vinyl kitchen floor?  Should you paint a kitchen floor?  How do you paint a kitchen floor?  Would painting the floor be worth the effort and time?

I struggled with answering those questions.  I came to 2 conclusions: 
1.  I really couldn't make it any uglier!
2.  Eventually we're going to install real tile anyway.

Just to give you an idea of my kitchen/dining-room  floor plan, I made this simple diagram.
The black represents floor covered in counter-tops, fridges, etc.
The yellow is my ugly vinyl flooring.
The grey is carpeting (yuck!).
Eventually, we're going to rip everything out and tile the whole thing,
but that project is possibly years away.

So you can see that I really didn't have a ton of vinyl flooring to paint.  Considering the back-breaking and mind-numbing work required in painting the small area of flooring I DID paint, I would never consider painting and stenciling a large area.  I have a new found respect for all you crafty people who painted and stenciled entire rooms.  Wow!  What a lot of work!

My inspiration!  Check out this fab post by Shabby Coast Cottage!
[Photo by Shabby Coast Cottage]


painting wallpaper lines
I got my stencil and learned the technique from this lovely post by JDC.  
[Photo by JDC]
TL: Primer | TR: Floor paint
BL: Tracing stencil | BR: Painting stencil

Here are the steps I followed to paint my floor:
  1. Removed drawer under my stove. (mine's not a broiler)
  2. Cleaned the floor with ammonia and rinsed it well.
  3. Sanded the floor with 150 grit sandpaper.
  4. Vacuumed and wiped up all sanding residue.
  5. Taped off edges, trim, and bottom of fridge.
  6. Painted on a layer of KLEAN-STRIP EASY LIQUID SANDER.
  7. Painted on KILZ 2® Latex Primer.
  8. Painted on BEHR PREMIUM® Porch & Floor Paint--2 coats.
  9. Traced stencil guidelines with gel pen.
  10. Stenciled in BEHR PREMIUM PLUS ULTRA® Semi-Gloss Enamel.--2 coats. 
I bought some clear varnish to use as a top-coat but have yet to apply it.  It's been several months since I've painted the floor and it's holding up so nicely, I doubt I'll ever paint on the vanish.  

Here's a couple more "afters": 
The texture of the floor is still evident, but I like it soooooo much better.  I mostly clean the floor with warm water.  When that isn't enough, I have a swiffer thingy that I use and it works great.  

How about you all?  Would you ever consider painting your kitchen floor?


Happy crafting and big hugs from Montana,
Pin It
Before you click away, I'd like to invite you to join in my current sewing/craft challenge.  

Friday, March 15, 2013

Plaid Stencils and Folk Art Craft Paint Review


Besides connecting with amazingly creative people from all over the world, the second best thing about being a blogger is getting opportunities to review craft products.  This post is about my experience with FolkArt stencils.  I've been a big fan of Plaid brand products even before I began blogging.  You see, I'm a Mod-Podger from waaaaay back!

These are all my projects featuring Plaid products:

Most of those tutorials feature projects using either Mod Podge or various brands of acrylic craft paint.
Besides the Patches for Girls post, I haven't worked much with stencils...until NOW!

paint, stencils, handmade charlotte, plaid, folk art


Happy crafting and big hugs from Montana,


Connect with Plaid via these social media links:
Plaid on Facebook
Plaid on Twitter
Follow Plaid on Pinterest

Sunday, March 10, 2013

Scarf: Rolled Hem Foot


This month's sewing challenge is kicking my butt!  The rolled hem foot I chose to work with is a tricky little thing that I can't seem to get a handle on.  Plus, my photography skills...well please accept my usual apologies.  I think I'm loosing my blogging mojo!  Not that I had much to brag about in the first place!

Anyway, March's sewing challenge is to try a new sewing machine foot.  I choose the rolled hem foot.  I took it out once many years ago and it was a disaster.  So I decided to do a bit more research and really try to master the foot.  I started out practicing on a thin cotton print.  You may recognize it, I used it to make my maxi dress


After stitching about 5 inches, I was really getting the hang on it.


I stitched the length of the scrap of fabric and proclaimed myself a master!
What went wrong so many years ago when I first used this lovely foot?


So, enter the scarf fabric.  I bought this Red Tag (clearance sale) fabric at JoAnn's a couple weeks ago with making a scarf in mind.  At $3 a yard and me only buying 18 inches, it was a bargain!
The fabric itself is red and green paisley on a navy blue background with thin stripes of gold metallic thread.  You can see it draped over my sewing machine below and notice how sheer it is.


Once I squared up the fabric (not an easy task with this thin fabric) I pressed a 3/8 inch hem along the edges.  Then, using my trusty rolled hem foot, I started stitching.  The results were less than stellar.  Only about 20% of the hem was a perfect double fold.  The rest was only a single fold.  Maybe you can see in the photo below how the second fold didn't catch.


I considered trimming off the offending hem and trying again, but in the end just decided to live with it.  I got out my lighter and singed the fraying edges that didn't get folded into the hem.  I don't know how it will hold up in the long run, but for now I'm not too worried about the hem coming undone and the fabric unraveling all over the place.  Here's a look at the length of the scarf.  You can also see how I rounded the corner on the end:


I had both my kids take a crack at photographing me wearing the scarf.  While I'm sure they did their best, the results were pretty blurry.  Here's the well-edited best of the bunch:


In conclusion, I believe that my rolled hem foot has limitations when it comes to fine, sheer fabrics.  I have some thin jersey that would make a great scarf as well....but I'm not sure if I'll try to hem it or just leave the raw edges.  Hmmmm, decision, decisions!

What is your experience with rolled hem feet?  Any tips on working with sheer fabrics?  

Visit March's sewing challenge homepage here:
Visit Fancy Feet Homepage

Happy crafting and big hugs from Montana,
Pin It
Before you click away, I'd like to invite you to join in my current sewing/craft challenge.  
Related Posts Plugin for WordPress, Blogger...