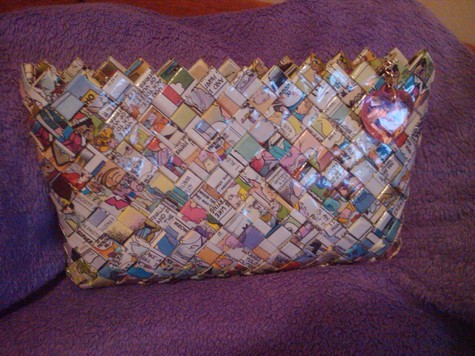
The background for this purse can be found
here. You'll also find lots more pics of the purse.
Alright my friend, let me begin this tutorial by saying
don't let all these pictures and steps intimidate you. I learned how to weave paper from a very basic tute without too much trouble. So my hope is that this tute will be MUCH easier for you to follow. My goal was to create a tute that you could rely mainly on the photos to teach you the technique, so let me know how I did. Please
contact me if anything is unclear. Even though this project ultimately became a little purse, I'll often call it a "basket" in this post.
Supplies:
Paper cut into 20 strips around 2" wide by 20" long.*
Any low-tack tape like painter's tape.**
Decoupage, acrylic medium.***
Paintbrush.
Scissors.
Clothes pins or paper clips.
*You could make it easier on yourself and use something that doesn't require all the cutting and folding. I.e. sewer's measuring tape, bias tape, flat shoelaces, etc.
**Most tutes ask you to use clothespins to hold your weave.
***I love the finished quality the "modge" podge lends, but it's not necessary. Some white school glue to secure the finished edges would be be a good idea though.
<><><>
 |
1. Fold your strips of paper in half and then fold each edge to the center fold. Basically you are folding your strips of paper into fourths, but the cut edges are inside and out of view.
2. Start weaving your strips together. Over, under, over, under, trying to keep the strips perpendicular to each other.
3. For this project, I am weaving 4 strips going one direction into 16 strips going the other direction.*
4. I center and even out all my strips, and arrange them so I have as tight a weave as I can manage. Then, I tape it all together using my low-tack masking tape.
*If you wish to make a box with a flat bottom, simply use an equal number (the number must be even) of strips in each direction. For example 10 by 10 rather than 4 by 16. I haven't attempted an odd number combination, i.e. 3 by 15 or 9 by 9, but intuitively I don't see how it will work. That said, my curiosity is piqued and I have to test this theory! Stay tuned....;-)
|
 |
5. Beginning on a side with 4 strips, I divide them in half and cross the two central strips. You can see I've marked the two central strips blue and pink. The outer strips are marked green and yellow.
6. You can see how after the central strips are crossed, they are woven into each other. This is hard to explain verbally, but hopefully the pictures will tell the story effectively.
7. After I pull the weave tight, you can see I've formed a corner. I place some tape to secure what I've woven so far and repeat this process on the opposite side with 4 strips.
8. This is what it looks like so far with 2 opposite corners formed.
|
 |
9. Now we go through the same process, but with the sides with 16 strips of paper. I take the two central strips and cross them. You can tell which one crosses over the top by paying attention to what you have already woven and continuing the pattern. It'll be obvious if you go over when you should have gone under, and easy enough to correct if you catch it at this point. I've marked the one that weaves over the top in pink.
10. You can see how I weave the pink strip through the adjacent strips and how another corner is forming.
11. The next strip to weave is marked green and is woven right above the pink strip.
12. After the green strip is done, I continue down the row of strips until all 8 strips from each side are interwoven. Then, I pull them as tight as I can and secure with more tape.
|
 |
| Now each of the four corners have been created and this is what it looks like so far. You can see that the bottom of our basket is not flat. I originally started this project hoping to make a rectangle shaped purse. I had woven many tall, square skyscraper shaped baskets by weaving with equal-numbered sides, i.e. 4 by 4 and 12 by 12. I assumed that I would weave a rectangular, cereal box shaped basket if began with an unequal combination of strips, i.e. 4 by 16 or 6 by 12. However, I was proved wrong. I was pleased with my results none the less. Serendipity: a happy accident! |
<><><>
 |
When I formed the corners, I made all the strips change direction from perpendicular to a 45 degree angle. The strips are all laying the correct directions, I just have to be systematic about how I weave them together. I begin at the bottom (see pink strip) and weave it completely and move to the adjacent strip (see green strip) and begin again.
13. You can see in this pic that the tape is covering the corner I formed from 4 strips. 2 of the strips (pink and yellow) are ready to be woven into the 8 strips from the adjacent corner.
14. Here I begun weaving the pink strip into the 8 adjacent strips.
15. Here I have woven all 4 of my strips into the 8 adjacent strips.
16. This is just another vantage point of the previous pic. I had to pull it all tight and secure with tape. Then flip it over and weave the other side as well.
|
 |
| I continue to weave until the strips are too short weave any more. Here are a few pics of what it looks like so far. At this point, I spend a lot of time making sure my weave is as tight as I can make it. When that task is complete, I get out my "modge" podge and give the outside a coat. I don't decoupage near the top edge as this portion is secured with tape and none of the edges are finished yet. When that coat of decoupage is dry, I remove the tape from the inside that was securing the weave on the bottom. Then I paint a coat of decoupage on the inside. When that coat is dry, I am confident that when I remove all the remaining tape, the basket won't un-weave itself. |
 |
Now it's time I finished the top edge. I located my shortest strips and those helped me determine where to create the edge.
17. I picked two strips that were crossing. You can see the pink is crossed behind the green strip.
18. I fold the pink strip over the green strip.
19. I trim the pink strip at about 3/4" from the fold. (Or the width of 1.5 strips.)
20. I tuck the pink strip under the green strip, hiding the cut end. I repeat this all the way around the basket.
|
 |
21. When all the trimmed strips are tucked away, you get something that looks like this.
22. I trimmed the remaining strips.
23. When all the long strips are trimmed away, it looked like this.
24. To ensure that nothing will unravel, I applied some glue under all the tucked strips and secured them with clothes pins to dry nice and tight. Paper clips would work as well.
After that was dry I applied one more coat of decoupage inside and outside to cover the whole shebang. The resulting basket has a very unique shape. What would you call it? A spiky strawberry? A flat-topped diamond? I'd love to hear your ideas on this!
I've compiled a short list of paper weaving tutorials I've run across for your perusal: |
This is the
tutorial I learned paper weaving from. It had around 10 photos and no decoupaging. As you can see, the weave creates diamond shaped patterns on the sides of the vessel.
Here's a great example of another way to weave paper. Notice the weave creates square shaped patterns on the sides of the box. It's a pretty good tute. You can find it
here. I use a box to hold my old newspapers awaiting recycling. Wouldn't it be cool if I made a newspaper recycling box out of recycled newspapers?
This is a good tutorial for making cylinders. You form them around a cup. I think it would make a great project for me to do with my kids. You can find it
here.
Besides weaving paper, I'm co-hosting and participating in the Retro Pillow Challenge. I hope you'll click on this button and visit the homepage. The challenge ends Sept. 30th so you still have time to join us!
Thank you all for making this blog so fun for me! I love hearing from you and meeting new crafters from all over the world.
Happy crafting and big hugs from Montana,