Sunday, February 3, 2013

Vote: Curved Seams Sewing Challenge!


Flat, curved seams ended up being trickier than I ever imagined.  I read some tutorials, watched a video, practiced on my own, and STILL don't feel super confident sewing curved seams!  I love the effect though, so I doubt I'll be hanging up my curved-seams-hat anytime soon.  

Big thanks and super big hugs to all the challenge particicpants!  The participants represent a wide variety of skill levels and come from all over the world.  The finished projects are just as uniquely creative as the artists who made them.  Take a look:

Visit Artfully Caroline!


Caroline at Artfully Caroline was able to finish 2 curved seams projects.  She blogged about the m HERE.
The first project was this pretty pillow using the drunkard's path quilt block.  


Caroline's second project was this small table runner.
The abstract design is set off with some wiggly free motion quilting.
You can find Caroline's tutorial pager HERE.

Visit Celtic Thistle Stitches!

Fiona from Celtic Thistle Stitches completed a two-sided tablecloth.
I attempted to brighten/lighten this photo, so the colors aren't true--apologies!
See the original photos in Fiona's blog post HERE.
Fiona used the scraps from the front to applique a flower onto the back side of the tablecloth.
Visit Celtic Thistle's tutorial page HERE.

Visit PLAY SCULPT LIVE!


Line from PLAY SCULPT LIVE included curved stitching on one side of a small tote.
She blogged about it HERE.

The other side side Line's tote is just as creative as the front.
Visit Threading My Way!


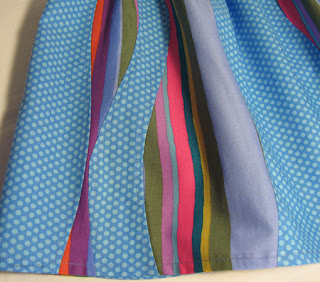
Pam from Threading My Way made a dress featuring  wavy curved seams in the skirt.
She blogged about it HERE.
Here's a close-up of those curved seams.
Check out Pam's tutorial page HERE.


Pri from Sri Lanka made this lovely cushion with an inset circle.

Pri doesn't have a blog so I posted on her behalf HERE.


I used the drunkard's path quilt block to make this quilted tote.
I blogged about it HERE.

Here's a side view.  I quilted the whole thing in concentric circles.
And now it's time to vote!  Please note the following:
The order of the projects is randomized.
Vote for up to 3 projects each time you vote.
Anyone may vote once per day.
This poll is just for fun, the winners will receive bragging rights and badges.


Happy crafting and big hugs from Montana,

Pin It
Before you click away, I'd like to invite you to join in my current sewing/craft challenge.  

Wednesday, January 30, 2013

Pri's Curved Seams Challenge entry!


Guess who signed up for my Curved Seams Challenge on January 29th and finished the next day?
Pri from Sri Lanka!!!!
Congrats on meeting the challenge!!!

Pri doesn't have blog, so I'm happy to host her project today.  
I'll give you some quotes from her email to me:
" I was so excited with the curved challenge & as you'll see burned the midnight oil to complete just one cushion cover. My intention is to do 2 for my sister whose color scheme is green."
"I'm really thrilled I was able to do those curves & get my circle ( it wasn't easy, much unpicking :)  ) .  'Cos I was so pressed for time I think  it all became really hard.  I added the trim but also hope to add some sequins as the dull green needs some bling but I just don't have time to do it for the challenge."
 Many kudos to Pri who stuck with the challenge even when time was short and the going got tough.  I applaud your effort and commitment!  I also love your cushion.  Those curved seams are tricky and to try a new technique and finish a project all in one day is quite an acomplishment!  Thanks so much for giving it go and I hope you won't be a stranger.  Go-getters like yourself are very inspirational for procrastinators like myself.  Here's another pic of your lovely cushion:


Click this button to learn more about this challenge:
Curved Seams Challenge Homepage


Friday, January 25, 2013

Quilted Tote Bag Tutorial


My Curved Seams Challenge project is finally done!  I posted about the beginning stages of my project HERE.  I used a great tutorial by Leanne at She Can Quilt.  Leanne also includes a video--how nice is that!!!
So I made my own template, followed Leanne's instructions, made 8 drunkard's path blocks, sewed them into 2 big blocks, and then bordered the blocks with 4 inches of grey fabric.  Here's a pic of my 2 panels:
They were rather large 20" square panels, one for each side of my tote.  

Now, I have blogged about quilted totes before HERE.  I gave pretty good instructions on how to assemble the totes, but I came up with some new tricks in constructing this newest tote, so I thought I'd share them with you.  

If you'd like to have a flat bottom on a tote without adding a separate gusset, you have to match the side seams to the bottom center and stitch through the corners.  I explained this step in detail on my previous quilted tote tutorial.  You can see from the pic below that the overall shape of the bag changes drastically according to how much corner you cut off:
 When you start with square or rectangle front and back panels, the resulting shape of the bag is no longer square or rectangular after you create the bottom this way.  The top opening will always be wider than the width of the bottom.  HOWEVER, if you start with a trapezoidal (triangle with it's head chopped off) you can end up with a rectangular tote bag with a nice flat bottom!
So, I trimmed each of my panels so the top width was 4 inches shorter than the bottom width.  Or more simply put, I cut from the bottom corner to a mark 2 in. from the top corner on each side.  Was that simpler?    Perhaps this picture will be more helpful: 

I made the sandwich of the top panel, the batting, and the lining panel for each side, and then I machine quilted through all the layers.  The first panel I quilted in concentric circles.  I loved the effect, but all the stopping and starting was tedious.  On the other side I made one big spiral instead.  The effect was just as good and the quilting went much faster:

Another something new I tried with this tote was to add an interior pocket.  You can see the stitching on the outside of the bag, but I didn't think it was too distracting.  The alternative was to stitch it in by hand and I wasn't up for that.  Here's a couple pics of the pocket:

Next, I trimmed up the panels and attached them right sides together with bias tape.  I finished the top edge of each panel first, and then placed the panels together and finished the side and bottom seams.  I didn't bother with neat finishes on the bottom corners because I was just going to cut them off later anyway:

Here's some pics of how finished the corner seams.  Let me know if you have questions:

I added the handles, and the tote was done!  The most trying part was the quilting.  I have no patience for quilting and it ruins my back.  The best part was finally getting to try out some curved seams!  So here are the glamour shots of the finished tote.  I even pulled it inside out so you could see the inside.  I love the pallet and the mix of patterns.  I was into black and browns for a while, but grey is definitely my new favorite neutral.  I just love it with everything!


Here's a good shot taken by Mr. Ricochet.  You can see that starting with the trapezoidal shaped front and back panels resulted in a very rectangular-shaped bag:

You can learn about the Curved Seams Sewing Challenge here:
Curved Seams Challenge Homepage

Happy crafting and big hugs from Montana,
Pin It
Before you click away, I'd like to invite you to join in my current sewing/craft challenge.

Since this whole curved seams thing is new to me, I'm linking up to Celtic Thistle Stitches' New to Me in 2013 link-up party!  It's a great party to share what you've learned and get inspired by others' projects.

Friday, January 18, 2013

Cleaning the dirtiest iron


How dirty is your iron?  When was the last time you cleaned your iron?


Yikes!  This iron came with my husband who got it over a decade ago.  As far as I know, I'm the first person to clean it.  Sad, right?  I have no excuses.  I'm just a lazy procrastinator.  Yes, I am.

I have been pinning various iron cleaning methods, and decided it was time to try some out.

First up is salt:


I poured some salt on a towel and ironed over it on a medium heat setting for several minutes.  I noticed some cleaning was occurring, but the results were less than satisfying.
It was working though. You can see how dirty the salt got:

Next up was dryer sheets:


I tried both new and used dryer sheets with the heat setting on low to medium.  I put a white piece of paper between my ironing board and the dryer sheet.  As you can see, some grime was eventually transferred to the dryer sheets:
However, after griming up 4 dryer sheets, I couldn't see much of a difference in the surface of my iron.

Next was steel wool:
 I didn't find a pin using steel wool, but I figured I needed something abrasive to get this junk off.  I just spread out a thin layer of steel wool on a sheet of paper and ironed over it, rubbing back and forth and in circles.  This method showed the most significant cleaning power, but my arm was getting tired by this time and the going was so slow.

What worked?
MAGIC ERASER:


2 minutes with a damp Magic Eraser on a cool iron and the whole stinkin' thing was shiny and clean!
I used up half an eraser, but it was much faster and easier than any other method.  
Just look at the difference:

I promise I won't allow my iron to get this dirty EVER AGAIN!!!

How about you guys?  How dirty is your iron?

Happy crafting and big hugs from Montana,
Pin It
Before you click away, I'd like to invite you to join in my current sewing/craft challenge.

Since this is a first for me (and my iron!) I'm linking up to Celtic Stitches' New to Me in 2013 Linky Party!
Related Posts Plugin for WordPress, Blogger...