Showing posts with label wallet. Show all posts

Monday, January 9, 2012

From Ricochet's Tool Box


I'm not quite sure sometimes if I'm more clever or cheap or lazy.  Most likely it's a combination of these qualities that make me the crafter that I am.  Allow me to elaborate, please.  There is always a home improvement project going on at my house.  Hence, we always have an abundance of blue painter's tape lying around.  As you probably already know, the main use of painter's tape is to tape off areas that you don't want to get paint on.  Also, the main quality of the blue tape is that it is low tack, and therefore easy to remove and doesn't leave a sticky residue behind.  Because we have a lot of it lying around our home, I have been utitlizing it in various crafty projects.  Here are some examples:
I used lots of blue tape in my Paper Weaving Tutorial.  It really
helped to secure the weave and keep it nice and tight.  When
it was time to remove the tape, it left the paper undamaged.

I used blue tape in my Tudor Rose Tutorial to secure the leaves to
the petals.  When I tried it with stick pins, the pins caught up on parts
of my sewing machine and fell out when I was rotating the flower.

This is a photo of wallet I was working on a while back.
I used tape to mark where I wanted to place the inside pockets.
I also wrote the measurements on the tape.

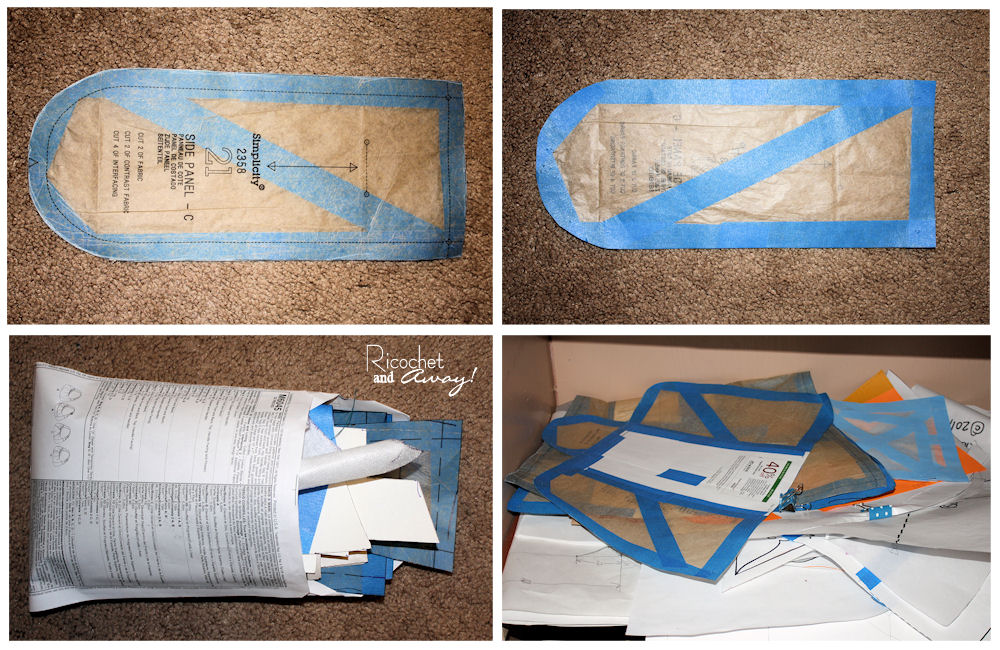
When I buy a pattern, I unfold all the tissue and tape around the
edges of all the pattern pieces.  Then, I cut out the pieces.  This
reinforces each piece and makes it really easy to trace onto fabric.
The blue-taped pattern pieces don't fit neatly in their original envelope,
but usually I paperclip them all together an lay them on a shelf.
I only take the time to do this with a pattern that I know I will use over
and over again.  

As you can see, blue tape is used all throughout my craft room.

The masking tape doesn't have to be blue, of course.  When I was making
 The Envelope Wristlet Tutorial, I used some regular masking tape
to help me mark where to place the magnetic clasp on the flap.

Because it has a higher tack than the blue tape, I used regular masking tape
to keep the edge of the flap clean and decoupage free.  You can see
the finished project here: Another Modge Podge Upcycle.

Stay tuned for more unconventional crafting supplies from Ricochet's tool box.  Also, please check out our current sewing challenge, The Naughty Notions Challenge.

Happy crafting and big hugs from Montana,

Monday, August 1, 2011

The Envelope Wristlet

Check out this very simple wristlet to sew.  The finished product is about 4"x7".  It is the perfect size to bring on a night on out the town.  When I happen on a rare opportunity to go out with the girls, I usually whip up a little wristlet to match my outfit.  Besides being fun and cute, wristlets are perfect for dancing and negotiating public restrooms.  You slide the strap up to rest in the crook of your elbow and your hands are free to boogie-woogie or wash up. 
No more purse babysitters needed. 
No more setting your purse down on a restroom floor
or forgetting it on the hook in the stall
or leaving it in a taxi. 

Supply List:

Scraps of vinyl and something for the lining at least 7.25"x 12" each.
Freezer paper, pencil, ruler, scissors, paper clips
Modge Podge to secure the lining
OR
Bias tape to secure the lining
Magnetic clasp, regular snap, OR Velcro
Stuff to decorate with!
Heavy duty thread
 Sturdy sewing machine needle, i.e. one made for leather or topstitching
Imagination!


Does it have to be vinyl?  No, you could use a sturdy oilcloth, felt, or leather.  Anything that will not need to be hemmed and is sturdy enough to keep it's envelope shape will work. 

I found this piece of blue vinyl at a garage sale for a buck.  Someone must have bought it to redo the cushions on their boat. 


The next step is to construct the simple pattern.  I have it drawn on my sewing table.  I suggest you draw this out on a sheet of freezer paper. 

Start with drawing a rectangle 7.25" wide and 11.75" tall and cut it out.  Make a mark at 9.5" on each side.  This mark is where you will begin your curved line. 

Achieving a uniform curve is easy if you trace the edge of a salad plate or Tupperware lid.  Or you can fold your rectangle in half, longways, and free-hand one side of the curve and trace it onto the other side. 

Now that you have the pattern in freezer paper, you can iron it on to your lining fabric and cut it out.  Trace it onto the BACK of your vinyl and cut it out as well.  Word of caution:  Vinyl doesn't like to be ironed.  It melts and ruins irons and ironing boards. 


OK, I know it's "Mod" Podge and not "Modge" Podge, but I am stubbornly sticking to my long-lived misconception about the the real name of this wonderful glue product.  Funny that no one in blog-land has corrected me on this...maybe I'm not the only one!  Most likely you all are just being polite, right? 

Back to the tutorial, you can look at the pics above and see the process, so I won't type it all out again.  However, I will emphasize the importance of waiting for the MP to dry completely.  It takes a little longer in this project because the vinyl doesn't breathe.  Plus, you're going to be sewing this and gunking up your machine with wet MP would not be good.

Anyway, I decided to glue on the lining fabric.  In my previous wristlet projects, I used bias tape to secure the lining to the vinyl and finish all the edges.  Here are a some examples:


As I mentioned earlier, you can't iron vinyl.  But how does one get the wrinkles out?  Or in this case, put the wrinkles in?  To get them out, I usually roll up the vinyl and forget about for a few months.  When I unroll it, most of the creases are gone and the whole piece is just a little curly on the edges.  The rule of thumb for storing vinyl is: roll it up, don't fold it.

Now, to put intentional creases into vinyl, I use those heavy duty office paper clips.  You could use a ton of clothes pins or regular paper clips as well.  Or you could sandwich your folded vinyl between some heavy books.  How long?  About 30 minutes and your vinyl will be creased enough to work with.  Ultimately, the stitching and magnetic clasp will keep everything folded the way you want.


The next step is to decorate!  Studs are a quick and easy way to make a big statement.  Machine embroidery, decorative punches, buttons, spray paint, and fabric flowers would all look great. 

The inside edge doesn't require finishing, but I added a strip of pink bias tape to mine.  It will make it easier to see in a dark dance club, and softer to the touch.  Plus, that little splash of color is fun and unexpected!  Whether or not you add the bias tape, you need to snip off the corners of the inside edge as shown in the pic above. 

Next, I added the magnetic clasp according to the directions on the package.  You can use a regular snap or Velcro as well.  The back of the clasp shows through the top of the flap.  I covered it up with a flower and attached it with another stud.


The last steps are to make a strap and sew it onto the upper side of your wristlet.  I made my strap by folding in half a long strip of vinyl and stitching near the edge. 

Next step is to get out your paper clips again and re-secure the bottom fold.  Now this fold is "for keeps" so double check and make sure you have no wonkiness you'll regret later.  When sewing things like leather and vinyl, all your stitch-work is "for keeps" because the holes left from sewing will not heal themselves like they do in regular fabric. 


Take your time and carefully stitch up both sides of your wristlet. You need to set your machine to the longest stitch length when sewing thick things like vinyl and leather.  Make sure to start and stop stitching with a secure back-stitch. Stitch along the inside edge where you snipped off the corners (see step 3 above).  Making the inside seams turn in like that help keep your valuables inside your wristlet.  And as an added bonus, they hide the bright pink bias tape I used, keeping it a surprise!

You're done!  Go show it off and make one for all your friends!  Email me a picture of your finished wristlet at ricochethandbags(at)hotmail(dot)com.  I would love to see what you came up with and include it on Ricochet and Away! 

Thanks for taking the time to read this tute!  And double thanks for hitting the "follow" button on the sidebar!!!!  And triple thanks for leaving a comment and letting me know what you think about all this wristlet madness!!!

Before you click away, I'd like to invite to participate in my current sewing challenge.

Happy crafting and big hugs from Montana!


This project got a feature!
I'm so proud!
Yay!

Thursday, July 28, 2011

Something to savor....

Here's a sneak-peak at my next tutorial.  It is a simple envelope-style wristlet that can be embellished in endless ways for a variety of different looks.  I'll give you the pattern and directions, but the decoration is up to you!  I'll post this next week.  But in the meantime, you'll need to locate a scrap of vinyl at one of the garage sales I know you'll be attending this weekend. 

I'm headed out to my annual family reunion, so I'll be gone until Monday.  The family in question is my late maternal grandmother's family.  They are Serbian (well, I am too!), and proud of it! Imagine a bunch of dark and handsome men with deeply dimpled chins and their female counterparts camping and fishing in the Beartooth Mountains of Montana as if they were little brown bears themselves.  While pale and freckly me and my red-headed children reapply our sunscreen and get our fishing tackle stuck in trees!   The best thing about my Serbian family, is they strive hard to make everyone feel welcome and you need not be "blood" to be "family".  Many of the regulars at these reunions are not blood relatives.  We have a history of taking strays into our fold and love them thoroughly nonetheless...

In the meantime, please check out all my posts and pages and leave me lots of comments!  I would love to return home from a weekend of camping to find my inbox full o' feedback!

Goodbye in Serbian is zbogom or dovidjenja.
Good morning is  dobro jutro.
Good night is laku no'c.

Happy crafting and big Serbian hugs from Montana!

Thursday, July 7, 2011

ModgePodge Wallet Upcycle


I've been saying to myself for ages now that I NEED a new wallet.  But you know how the hair stylist's roots are often showing, or how the professional gardener's lawn needs mowed?  Well, this girl who makes cute handbags all day long has a ripped and dilapidated wallet.  So one day while searching the net for something totally unrelated, I came across this unbelievably awesome tutorial. 
Jen from Scissors and Spatulas and her "{Every Gal Needs a Cute Summer Clutch!}" tutorial is the absolute inspiration for this tutorial.  So please follow the link and check out her gorgeous clutch makeover.  I posted her button at the end of this tute as well. 


Before we get too far into this post, let me apologize for the overload of hot pink daisies in all the pics.  I found a new button in my photo editing program called "picture tube" and I simply went crazy with it.  Yes, there can be too much of a good thing (especially in the "before" pics above). 
You can see that I started with a thrift store leather wallet with a metal frame that has those little balls that you twist to close it.  Price: $.99.  You may also have noticed the smear of white Modge Podge on the surface of the wallet.  Well, I started painting on the Modge Podge before I realized that I forgot to take a "before" picture.  Of course, I didn't think to just flip the thing over and photograph the clean side.  Lesson learned.  Hindsight is 20/20. 
Anyway, this wallet had all the nice little pockets that I love, plus a big zippered change pocket right in the middle.  My old wallet was a trifold with the change pocket on the outside, and it was so hard to get the coins out of that tight little space.  This new coin pocket ROCKS!!!
To get started you will need a wallet, some fabric (I used a cotton quilting fabric), Modge Podge (I used matte finish), a soft bristled paintbrush, scissors, and patience. 

1.  I cut my fabric quite a bit larger (maybe 1.5" on all sides--I just eyeballed it) than my wallet.  I wanted plenty of extra to play with since I had no concrete plan.  I painted on a layer of Modge Podge (aka MP) leaving a 1/2" clear border on all the edges. 


2.  I set the wallet in the middle of the fabric and adhered it to the MP.  I used a credit card to smooth out the wrinkles and push out the air bubbles.


3.  I could tell by this step that I had waaaaay too much fabric. 


4.  I trimmed the fabric down so I had only about 1/2" of extra on all the edges.  When you do it, you can measure ahead of time.  Why didn't I?  I'm lazy and didn't want to find my ruler, plus I was impatient and just wanted to get started. 


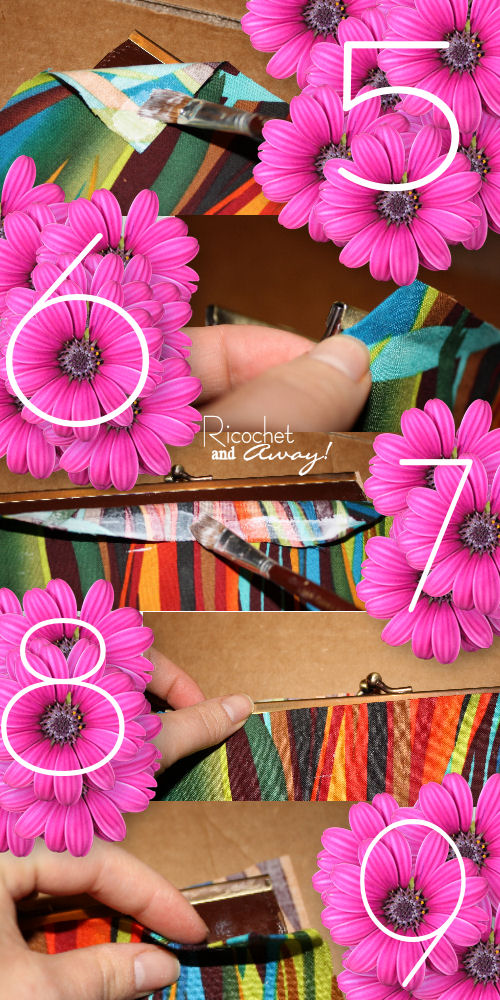
5.  I figured my best bet would be to miter all the corners.  I painted on some MP to the wrong side of the fabric at the corner.  


6.  I folded in the fabric corners just enough so the fold lined up with the corner of the wallet.   


7.  After I was satisfied with all the corners, I painted some MP on the top edge of the wrong side of the fabric.   


8.  It took some time to get it just right, but I folded under the fabric making the fold line up perfectly with the edge of the metal frame.  


9.  You can see that up to this point the fabric is still only adhered to the wallet in the middle and the edges all still free.    


10.  To get the sides folded under correctly, I started by folding the fabric back on both sides and painting a stripe of MP along each edge.  Then I tucked under the fabric so the folds lined up with the sides of the wallet.  This was a little tricky since the metal frame didn't allow wallet to open up flat.


11.  You can see here the corners are now mitered and pretty.  


12. You can try to do all your measuring and mitering of your fabric BEFORE you adhere it to your wallet.  BUT, be warned:  fabric saturated in MP gets stretchy and wallets have slightly curved surfaces so it's difficult to line up all the edges.


13.  This is where I finally adhered all the folded edges of the fabric to the the wallet.


14.  The next thing I did was to apply an
even coat of MP all over the outside of the wallet.  This will "seal the deal".


15.  I stuck my hand inside the wallet while I painted the MP onto the fabric.  Then set it up like this to dry. 


16.  As it dries, the MP becomes transparent.    


17.  I applied 3 coats of MP, making sure the previous coat was completely dry before starting the next.  The ENTIRE process up to this point lasted as long as 2 episodes of Glee. 


The next day, after having dried and "cured" all night, I wasn't happy with the roughness of the surface.   


18.  So, I sanded the surface with 280 grit sand paper.  This smoothed the surface, but left me with a less-than-lustrous finish. 


19.  So, I got out the steel wool and did a wet sand.  


20.  After the wet sand, I wasn't sure if I ruined the wallet completely, or what.  The surface was all milky again and I wasn't sure what was going to happen.  Thank goodness it dried up real nice and clear and shiny. 


21.  The very last thing I did was take my jeweler's cloth and polish up the metal. 


My daughter was kind enough to hold the finished product for a few closing photos.  I am loving my new wallet.  I hope you enjoyed this long-winded tutorial, and I hope you had a good time embarking on this journey through Craftdom with me!  Be sure to push the button below and give Jen at Scissors and Spatulas a look-see. 


This tute is linked to:


Passionately Artistic


Related Posts Plugin for WordPress, Blogger...