Showing posts with label handbags. Show all posts

Tuesday, February 26, 2013

Mini Tudor Rose


It's been too long since I've posted!  Truth be told, I've been looking for a job (besides wifing and momming and blogging) pretty diligently since the beginning of the year.  I am pretty picky about when and where I work, so it has been a tedious and time-consuming process.  I managed to get a position in the school system as a paraeducator substitute which I'm fairly pleased with.  I'm hoping for a permanent para position in the future.  I'm on call starting this week, and I'm so excited to try something in the "outside world".

I've haven't been sewing much, but I did find the time to create this little girl's handbag.  I got a special request for mother daughter matching Tudor rose purses and couldn't pass it up.  The mother's version is going to be a bit more chic with a zebra print paired with the red velvet.

If you're interested, I have several posts about this Tudor rose pattern which you can find under the tag "tudor rose" in the side bar.  Or you can go directly to my tutorial HERE.
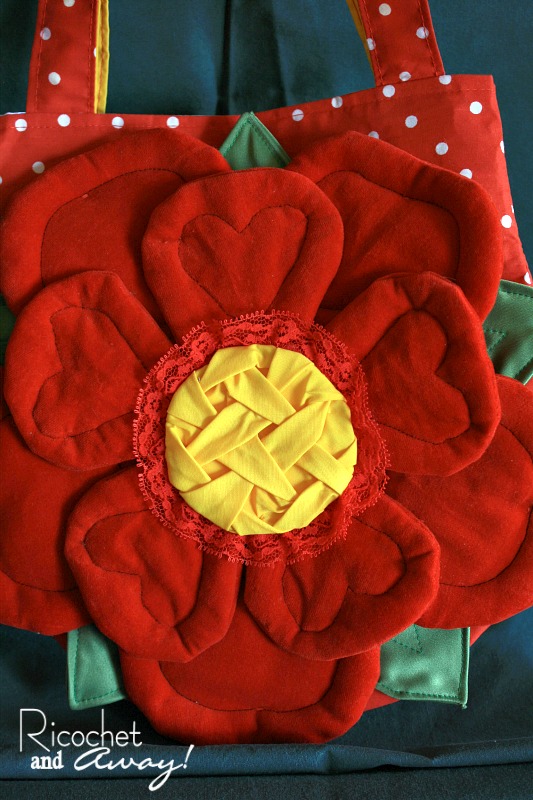

I deviated from the original design by omitting the inner leaves and adding some heart-shaped quilting to the inner petals.  The center is created with canadian smocking.  I've finally used that particular method of smocking enough that I don't have to refer to the instructions any longer!


I made the flower and the front and back of the bag first.  Next, I stitched the flower to the front.  Then, I stitched together the front and back panel, right sides together.  Last, I finished the seams with bias tape.


The back and lining are just plain jane simple, but with all the fuss and muss of the rose, I didn't want to overly tax myself!


What have you been sewing lately?

Happy crafting and big hugs from Montana,
Pin It
Before you click away, I'd like to invite you to join in my current sewing/craft challenge.  

Monday, September 10, 2012

Asymmetrical Place-mat Purse

A.k.a. the wonky envelope purse.

This is quick and easy purse to sew.  If you have made lined purses before,(pulling the entire purse through an opening in the lining) then this purse will take no time at all to sew.  If you're totally unfamiliar with sewing linings into purses, check out this tutorial by  Patty at Make it Cozee.  She takes great photos (much better than mine!) and let's the pictures tell the story.  So all you visual learners will totally dig this tute.


Easy Instructions:
  1. Check out my diagram and see how I gave an ordinary placemat a wonky asymmetrical fold.  Just play around with it until you get a shape you like.  Press down the folds and trim off the overlapping edges.
  2. Use the resulting placemat shape to cut out your lining fabric.  Remember to make sure you are cutting out the correct side of the lining.  With asymmetrical shapes it can get tricky!
  3. Press corresponding folds into your lining.  Now you can add pockets and the male half of a magnetic snap to your lining. 
  4. Stitch the side edges of your purse, right sides together.  According to my diagram, stitch the red edges together and the blue edges together.  Do the same thing to the lining, right sides together.
  5. Turn you purse right side out and place it inside your lining, right sides together.  Carefully pin the edges of the purse and lining together.
  6. Stitch all the way around the pinned edges, but leave a 3 inch (or so) opening on the front edge (the edge under the flap). Trim off the seam allowances at the corners.  
  7. Pull the fabric through the opening and situate until it looks like a real purse.   Press all the edges neat and tidy.  (See Cozee's tutorial for great instruction and photos.)
  8. Mark on the front of the purse where the female half of the magnetic snap should be placed.  Reaching through the opening in the front edge, attach the snap to the front of the purse.  See?  No measuring!
  9. You can hand sew the opening closed now, though I usually don't.  Then top stitch all the way around all the edges.  That's it!  You're done!
You could add some dimension to the bag by squaring off the bottom at step 4. The tutorial I mentioned in teh first paragraph also shows how to square off the bottom of the bag.  Check out Patty's tutorial HERE.   Or you could make a strap or handle and add it to the outer fabric at step 4 as well.  Adding some extra structure with interfacing or fusible fleece or Peltex/Timetex is another option.  A simple purse like this is also just crying out for fabric flowers or silver studs don't you think?

Did you notice the cool pintucks/mexican pleating on the placemat?  This corresponds with my current sewing challenge:  The Fab Fold Challenge.  So if you're reading this before 10-30-12, press this button and check out the challenge homepage:
Fab Folds Sewing Challenge

So what do you think?  Could you use a little wonky envelope purse?  How would you tweak the idea and make it your own?

Happy crafting and big hugs from Montana,
Pin It

Wednesday, February 22, 2012

Designer Handbag Cupcakes

Designer Handbag Cupcakes

I found these little sweeties on pinterest which brought me to this post.  The folks who make them can be found at Made Fresh Daily Cakes.  This is a business out of Atlanta, GA.  They deliver if you're interested!

My Photo

They are just too precious not to share!  Can you even believe the detail?????  Incredible!!!
They are $18 each and you must buy a minimum of 6.  I don't if I could bring myself to eat one as they are so cool to look at.  Maybe one of you talented folks out here can teach me how to make these out of polymer clay?  

Big hugs from Montana,

Wednesday, February 1, 2012

Naughty Notions: Finale and Voting


*update*
The winners have been announced!
Find out who won HERE!


Anyone can vote once per day throughout the month of February.  The 3 entries receiving the most votes will win a sweet blog button and well-deserved bragging rights.  
Please visit the blogs of the participants and show them love for all their hard work.  You will find a gallery of the finished bags and links to post and tutorials below the poll.


Your lovely hostesses:


sew la vie!
Keren


   and   
Rikka

Keren and I presented the challenge:
Create a clutch or small handbag using lots and lots of notions.  
We wanted you all to go crazy with the embellishment part and you did not disappoint.  Every entry is totally unique and over-flowing with creativity.  I know, I say this every challenge, but I really am so inspired and impressed by how differently each participant tackled the exact same problem.  Seriously, isn't it cool?
So, without further ado I am pleased to present the Naughty Notions Challenge entries.  They are in no particular order.  Please click the link in each caption to see more photos and read what the participants have to say about their entries.  Gorgeous, aren't they?


Find out more about 
Delilah's entry HERE.

Find out more about 
June's entry HERE.

Find out more about 
Caroline's entry HERE.
Find out more about 
Julie's entry HERE.
Find out more about 
Pam's entry HERE.
Find out more about 
Esther's entry HERE.
Find out more about 
Tanya's entry HERE.
Find out more about 
Kei's entry HERE.
Find out more about
Kristin's entry HERE.
Find out more about
Jill's entry HERE.
Find out more about
Cindy's entry HERE.
Find out more about
Lou's entry HERE.
Find out more about
Lakshmi's entry HERE.
Find out more about
Gia's entry HERE.
Find out more about
Jenni's entry HERE.
Keren's entry.


Find out more about 
Rikka's entry HERE.
xxxxxxxxxxx xxxxxxxxxxxxx xxxxxxxxxx

Thursday, January 12, 2012

My Naughty Notion Challenge clutch is underway!


It's time for me to stop planning and actually get started with my Naughty Notions project.  The project is due at the end of the month, and here we are nearly halfway there!  I had a mini panic attack when I realized that and immediately went to work. 
 Here's what I've done so far:

First, I chose a taupe (grayish brown) piece of vinyl.  I got this and
much more vinyl for free at a local auto-upholstery shop.  I just walked
in and asked if they had any scraps of vinyl that they would normally
throw away.  I walked away with a huge bundle of scraps.
It seriously never hurts to ask, right?

Second, I went through all my notions and narrowed them down to
just those in the black-white-silver family of colors.  I most likely won't
use all of these, but I'm determined to include as many as I can.

Third, I got out my Mod Podge and decoupaged a wide black lace
to my vinyl.  I've never tried this before, so I'm not sure how it'll work.
Looking at it today, after it's dried and cured, it looks great.  I'm
cautiously optimistic.  Still, I think I'll stitch around the edges to make
it all extra secure.  If this turns out like I hope it will, I'll give it away
on my facebook page.  Fingers crossed!

It is definitely not too late to enter the Naughty Notions Challenge.  If you think you can make a small purse or clutch by the end of the month, then go for it!  Signing up is easy as filling out a brief questionnaire at the challenge homepage.  Please scroll down the challenge homepage and check out all our fabulous participants! We are up to 21, that's a new record!

this button will take you to the
challenge homepage.

Happy crafting and big hugs from Montana,

Thursday, December 29, 2011

Pyramid Pouch Tutorial

This is a guest post I did for Stephanie at Toastie Studio.  I am reposting it here because I am way down in TX visiting my lovely inlaws and I didn't want to let you all think I've abandoned you!  This pyramid pouch is a quick and easy last minute gift idea.  I can make one in about 30 minutes.  You can vary the size, but make it too big and it loses it's cuteness and charm.  If you make it too small, you can't get your hand inside the bag to utilize it.  I love to fill a pouch with candy, a jar of my famous peach jam, and a maybe even a few ornaments or a scented candle.  It's a fun, versitile, and easy so I hope you'll give it a try!

Happy Holidays! 
Rikka J.


Fuse the interfacing to the backs of all the squares.  The rectangles don't need interfacing.  For this pouch l used med weight interfacing.  The outer fabric is a corduroy and the lining is linen.  You want to give your fabric enough body or stiffness to hold it's shape when it's all sewn together.  A sturdy canvas or thick corduroy may not require interfacing.  Batting (wadding) or fusible fleece are other good options.
Sometimes I don't cover up the ends of my zipper, but the results are well worth the effort.  Your pouch will look that much more neat and finished.  Plus, it's the easiest way to shorten a zipper that is too long.
  • 1. Line up a rectangle of lining, right side up, under the zipper, as shown.  
  • 2. Add a rectangle of the outer fabric, wrong side up, on top.  Stitch across.
  • 3. Repeat for the other side.  Fold back and press.
Where exactly do you place the rectangles?  I position them so the zipper opening, or the distance between the lines of stitching, will be 6".  

For you zipper virgins out there, this is how you get around the zipper and keep your stitches nice and straight:
  • A. Pin a square of outer fabric to the zipper, right sides together, as shown.
  • B. Using your zipper foot, stitch up to the zipper pull.
  • C. With the needle lowered, raise the foot and zip the zipper closed.  
  • D. Now the zipper pull is out of the way and you can stitch away.
Zips can be frustrating and confusing.  I avoided them for a long time.  There are a million tutorials out there on installing zips, so I won't go into great detail here.  Basically, you repeat the above steps for all the remaining squares of fabric.  Pay attention to the direction of the print on your fabric, and keep the right sides together, and you'll do fine.
  • 1. After you fold back your squares and press, you should have something like this.
  • 2. This is what it looks like from the back.
  • 3. Top stitch around the zipper and trim the little rectangles even with the squares.
  • 4. This is what the outside looks like all top stitched and trimmed.
At this point, you can add things like labels, pockets, straps, tabs, etc.  I kept this bag pretty simple for the sake of the tutorial, but usually I add a Ricochet label to the exterior.  If you used  batting or fleece, this would be the time to do any quilting, keeping your stitches well clear of the edges of the squares.
  • A. Pin the lining, right sides together.  Pin the outer fabric, right sides together.  Stitch around the perimeter leaving the bottom open.
  • B. This shows another view of step A.  The lining stitched together on one side, the outer fabric on the other, and the zipper is in between.  The bottom of the zipper is facing the camera.
  • C. This step is easier to see than it is to explain.  The side seams are matched with (and centered on) the zipper.  Pin the fabrics right sides together.  It looks a little like a space ship at this point. ;-D
  • D. Start at each edge/corner and sew towards the zipper, stopping just short of the zip.  You can see in the picture that I left an opening on one side of the lining.  Pin together the lining and outer fabrics, as shown, and sew right across the zipper (between the pins) through all the fabric.  
  • 1. Snip the corners and start pulling the bag inside out Through the opening in the lining.
  • 2. Machine stitch the opening closed.  No one will see the stitching because of where it will end up in the finished bag, so don't feel like like you need to hand stitch.
  • 3. Almost done!
  • 4. Done!
The very last step is to add something to the zipper pull.  A scrap of ribbon or trim works great.  Thanks for sticking with me until the very end!  I know I'm long-winded, and I do apologize!
Happy crafting and big hugs from Montana,


Related Posts Plugin for WordPress, Blogger...