Saturday, June 25, 2011

Fusible Interfacing and Parchment Paper

I use a lot of interfacing when I make my bags.  It takes some time to trace and cut-out all the pieces of interfacing and then fuse them onto my fabric.  To save some steps I took advantage of the non-stick and heat resistance aspects of parchment paper.  Now, I'm sure I'm not the first person to come up with this particular method I will describe in this post.  However, I've searched and can't find a tutorial using this exact technique.  I hope you find this useful.

In my early days of interfacing, I scoured the net for tutorials on all manner of application methods.  I discovered many instances where parchment was used to protect one's iron and/or ironing board from the messy glue on fusible interfacing.  It is extremely effective, easy to use, and cheap.  I have been using the same sheet of parchment for over 4 months and haven't noticed any decline in effectiveness. 

So, without further ado, let's begin this tute!


I begin by unrolling my interfacing (glue side facing up) across my ironing board.  Next, I lay out my pieces of fabric (wrong side down) across the interfacing.  I nudge everything up very close together so as not to waste any interfacing. 


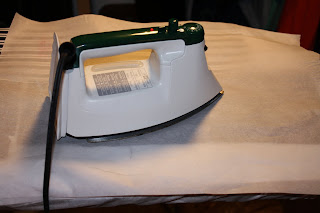
After I'm satisfied that all my fabric is wrinkle-free and wrong-side-down, I lay down my well-used sheet of parchment paper on top of the fabric.  I take my hot, dry iron and slowly fuse the fabric to the interfacing.  I am careful to make sure every piece is fused, but not overly concerned if some edges are loose because everything is getting ironed again on the reverse side later on.   


You can see in the left picture above that my fabric is fused to the interfacing, the interfacing is still attached to the roll, and there is a big empty space of unused interfacing hanging off the edge of my ironing board.  I still had more fabric to fuse, so I shifted the roll so the unused interfacing was sitting flat on my board and the fused fabric was hanging off the other side.  Then, I fused on the rest of my fabric as you can see in the pic on the right.


Then, I flipped it all over and cut out the fused fabric.  I saved the bigger and still usable pieces of interfacing ("waste not, . . . ") for another project. 


So here are all my interfaced pieces of fabric.  I ran an iron over the backsides once more for good measure, and decided everything is ready to sew!  Now, that was easy wasn't it?  No tracing involved.  All my fabric was fused at one time.  Very little interfacing was wasted. 

I hope you found this little tute useful.  Happy sewing!!


The Incorrect Bobbin-Filling-Method


Confession time.  I am a lazy seamstress. 

{{side note: I always want to use the term "sewer" to describe myself.  As in, a person who sews: a sewer.  But sewers are dark and dirty underground places teeming with mutant turtles.  So I try to refrain.}}

Where was I?  Oh yes, lazy.  Picture this, you have just sat down to a therapeutic session of sewing.  10 minutes into your sewing bliss, your bobbin runs out of thread.  Total bummer.  :-(  Of course, you don't have any extra full bobbins, because you are l-a-z-y.  Now, it would take exactly 87 seconds to un-thread your machine and reconfigure it to wind up a new bobbin and re-thread it.  BUT, you are too lazy!  Welcome to my world!


No, there will be no un-threading of your machine.  You will just pop an empty bobbin on the little bobbin-spinner-upper-thingy (tech term) and grab another, otherwise unoccupied, spool of thread.  You will wind up that bobbin while holding the spool in your hand, or just leave the spool on the table!  All you need to remember is to keep the line semi-taught by feeding the thread through your fingers. 

Yes, I know.  Your sewing machine manual has diagrams and step-by-step instructions for filling up your bobbins.  There are DOs and DON'Ts to bobbin filling. 


There are warnings.  Oh yes, bad things can happen with improperly threaded bobbins.  Things like . . . BOBBIN THREAD BREAKAGE!!!!!!  Yes, it's true.  You could have mess on your hands.  But really, isn't that a small risk compared to how fulfilling it it would be to cut down your bobbin-re-threading-time to LESS THAN A MINTUTE?  You be the judge. 

My Interpretation of Amy Butler's Cosmo Bag


Amy Butler (look her up, she's an awesome fabric and pattern designer)  wrote a book called Style Stitches that I recently purchased.  I took her Cosmo Bag and removed the pleats and added the petals from her Take Flight Handbag.  I redid all the interior pockets and added a removable extra long strap. 


I couldn't decide if I liked the petals on the top or bottom of the bag, so I did each side differently.  The fabrics I used were denim and canvas with the bandanna print bias tape, and I used my son's old bed sheet to line the interior.  All of the hardware came from old purses.


This bag is going to a lovely lady who is expecting her first baby in the fall.  She is going to use it as a diaper bag.  I'll make her a little changing pad and a zippered pouch to go with it.  I think it's stylish enough that she can use it long after the baby has grown.  Don't you think it would make a cute beach bag, or a tote to carry all your produce from the farmer's market?


Tuesday, June 21, 2011

Another Owl Purse is done!

Here's my latest project, finally completed!  This is my 5th owl bag I've done.  All of them are different. 

The eyes on this little guy are bordered with ric-rac.  The aqua colored trim is just bias tape, but I used it like piping. 

The gold fabric is a velvet-like upholstery.  The paisley is a home decor canvas. 


The reverse side features a wide pocket also trimmed in aqua bias tape.  This pic shows how the strap is tapered towards the ends and has several rows of top-stitching.===>


<===The back pocket is divided in half with a central line of stitching. 

The interior is a cheery floral print that I just love!  I put a zippered pocket on one side.  You can also see that I put in a magnetic snap to close up the top.===>

<===The other side of the interior has the duplicate of the exterior divided pocket.  I trimmed this one with bias tape as well.

This is how it looks on me.  It's a good-sized bag with a comfortable strap.  What more could a girl ask for?===>

Wednesday, June 15, 2011

Another Messenger Bag Done!

My first tutorial was for making a patch pocket with flap.  The messenger bag the pocket was sewn onto is now done!  The design on the flap was created by reverse applique.  Check it out and let me know what you think. 


Thanks for taking the time to look at and read a bit of Ricochet and Away! 
Please tell your friends and come again!

Thursday, June 9, 2011

Reverse Applique Gallery


 My son received a homemade super hero cape for his 6th birthday last year.  The design on the back of it was accomplished by reverse applique.  It looked so cool with it's graphic impact and roughed up edges.  I had to learn how to do it!

Turns out it is soooo EASY!!!!  You just quilt together two fabrics and cut away sections of the fabric on on top.  Well, it's a bit more complicated than that, but you can do it!  I promise!


The pic above and the pic directly to the right are actually the same purse.  I made a grey side with a print peaking through some sections, and I made the reverse side black with a more structured design of white showing through.

You can see all the random, ricocheting, top-stitching (or quilting) I did on the grey side.  The sections of grey that I cut out were randomly chosen.  The top-stitching on the black side is not so evident.  It took some time and planning to stitch around that pattern.  I drew it all out on a long piece of tear-away stabilizer and fused it to the top of the black fabric.  This worked as a good guide, although it was a tedious job picking out all the stabilizer from the stitching!
<===This is a diaper bag I made for my BFF.  The little heart on the pocket was crated by cutting out a heart-shaped hole in the red snakeskin.  It's a good example of how simple it is to make embellishments.  It would have been a major pain to create and hem a heart to sew on top of the flap.  Another tedious option would be to finish edges if a fabric heart with a satin stitch.  No way!  This looks just as neat and finished and was so easy.
Here's another simple example.  The orange is cut away to show the triangle of aqua beneath.==>
<==This is black canvas cut away to reveal blue corduroy.
I was going to make another checkerboard, but came up with this variation instead.  It is a more feminine version of the checkerboard.==> 
<==There's a lot going on in this one.  The black is cut away to reveal the purple.  Then, I put in some silver thread and glammed it up a bit.  Stars should be shiny, right?  In case there is some confusion, this is a pic of a messenger bag with the flap flipped up. 
This is a printed linen tapestry (or tea towel in the UK) that was revealed when I cut away the brown canvas on top of it.  From what I had been doing, this is a whole new way to use reverse applique. ==>
I need to cook dinner now, before my kids starve to death!  I promise to come back and proof-read this post later.  For now, enjoy and please let me know what you think by leaving a comment!
Happy crafting!


Yay this post got a feature, so go give 'em some love!


Related Posts Plugin for WordPress, Blogger...