

|
In case you're new to my blog, I've been co-hosting sewing challenges with my blogging friend Keren from sew la vie. Our first challenge was the Retro Pillow Challenge, then we did the Solids-Only Tote Challenge, and our current challenge is called Naughty Notions. The guidelines for this challenge are simple, create a clutch or small purse showcasing sewing notions as your embellishments.
|

My supplies:
Vinyl, wide lace
assorted buttons
leather studs
craft wire, bias tape
lining fabric, zipper
magnetic snap
Mod Podge, velvet ribbon
|
My tools:
ruler, paper clips
rotary cutter
scissors
paint brush
sewing machine
needle nose pliers
big needle
|

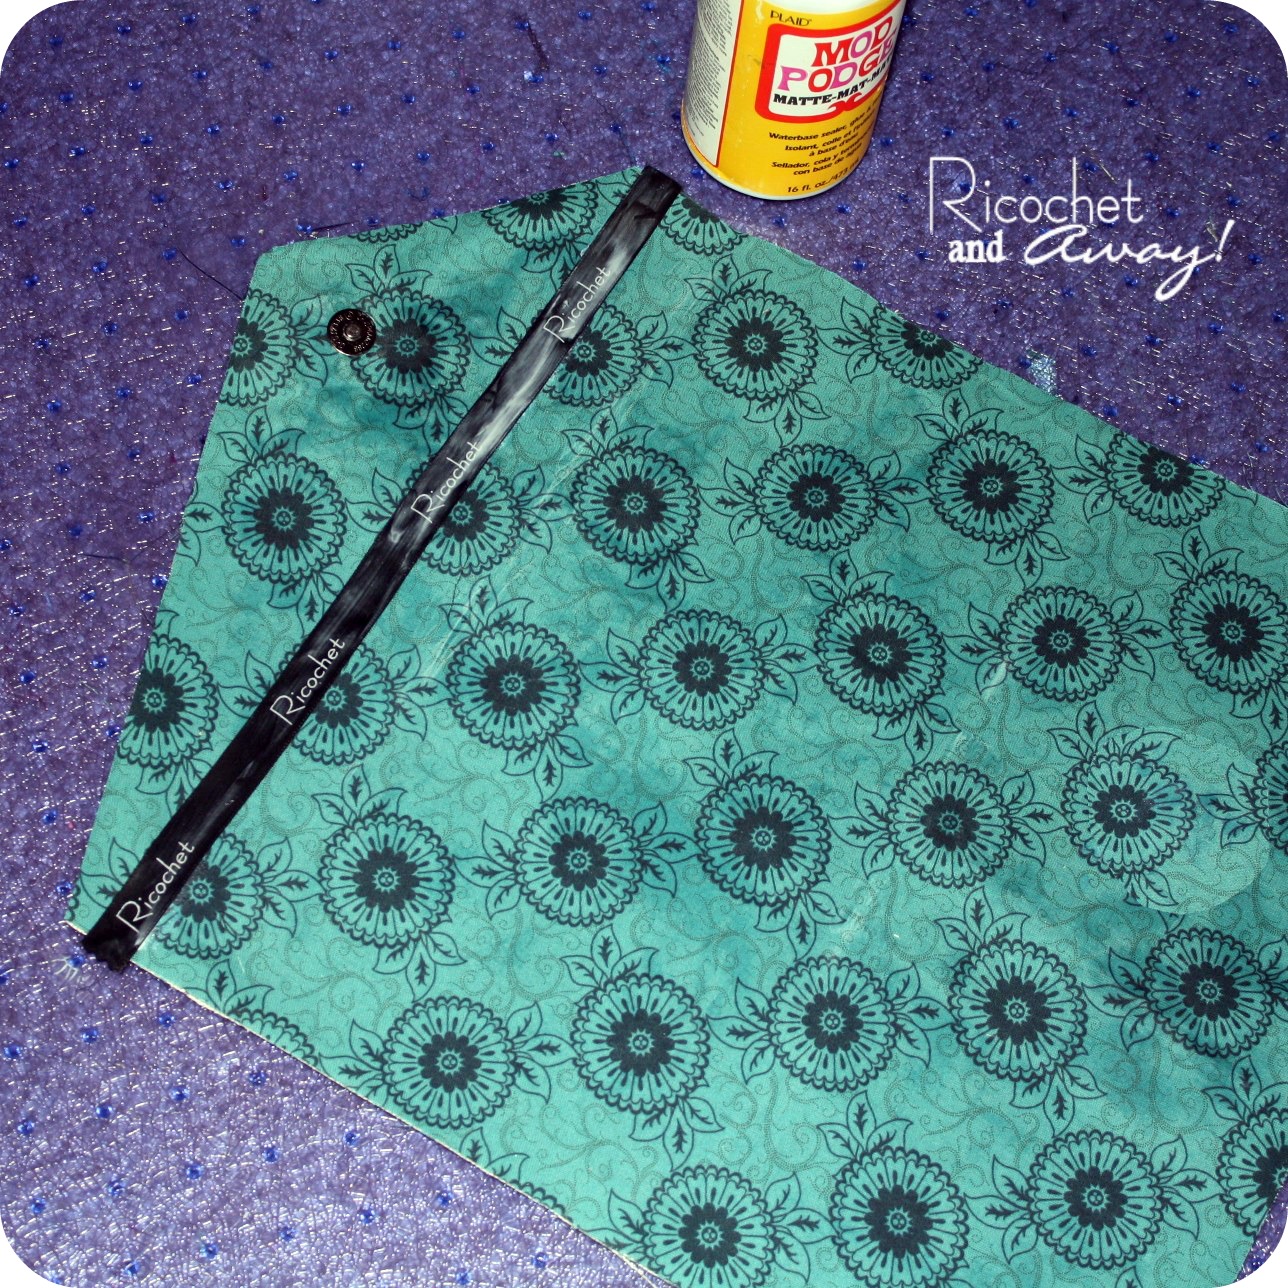
- The first thing I did was cut a perfect rectangle from vinyl. Then, I took some wide black lace and tacked it on to the right side of the vinyl with a stripe of Mod Podge. I started with a thin line of 'podge so I could tweak the positioning of my lace until I was sure it was exactly where I wanted it.
- Next, I saturated the lace with 'podge, avoiding the vinyl, and allowed it to dry.
- Last, after the 'podge was completely dry, I stitched down the edges of the lace.

- I trimmed two corners off to form the edge of the flap.
- I needed to know where the folds would take place so I made some creases with paper clips because you can't iron vinyl. That gave me some guidelines so I could plan my embellishments and where my magnetic clasp would go.
- I started with attaching a row of buttons to the space between the laces. I used my big needle to pierce holes in the vinyl and a fine gauged craft wire to secure the buttons. I found the wire to be much easier than thread for this project. I had some petal/leaf-shaped pieces of black suede left over from a previous project, and I attached them to the vinyl with round leather studs.
- I don't have an in-process photo of it, but I added the female side of my magnetic clasp to the vinyl. I also ended up putting an additional stud in between each of the buttons. Ouch! My fingers were so sore!
 |
I found this pretty turquoise cotton to use for the lining. I cut it to size and added the male side of the magnetic clasp. Just like I did in my envelope wristlet tutorial, I got out the Mod Podge and adhered the lining directly to the the wrong side of the vinyl. As you can imagine, the reverse side of the vinyl was very bumpy and pokey with all the leather studs and twisted wire. The decoupaging secured and contained all the sharp metal, but the finished surface is far from smooth. Next time I try this, I'm going to attempt to quilt my lining fabric to a thinner piece of peltx or timtex and nix the Mod Podge.
|

- While the 'podge was drying, I made a zippered pouch for the interior of my clutch. I sewed together two lengths of lace as well.
- The lace was sewn onto the back of the zippered pouch to form a mesh-like pocket.
- The pouch and lace pocket were pretty long, so I sewed up the center to create some side-by-side pocket action.

- I clipped the zippered pouch to the sides of the vinyl because you can't pin vinyl.
- I stitched the pouch and trimmed it even even with the vinyl.
- I finished all the edges with a black double folded bias tape.

- Normally I would just stitch up the sides and call it done, but that wasn't going to work with this clutch. The sweet side-by-side pocket action would have been too cramped to utilize properly. I needed to add some depth to the clutch for the pockets to be fully appreciated. And so entered the wide velvet ribbon.
- I stitched in a length of ribbon on each side of the clutch to open up the interior.
- Then, I was d.o.n.e!!!!!!

The resulting clutch is a mixture of sexy, edgy, and pretty. I love it!
I hope you'll visit the challenge homepage and spend some time getting to know the participants. We have a big group of very crafty and creative people who I'm sure are going to blow us all away with their cool clutches. Thanks for all your comments! Double thanks for becoming a follower!
Happy crafting and big hugs from Montana,

Linking up here:
http://www.creationsbykara.com/2012/01/look-what-i-made-link-party-1-25-2011.html
http://somedaycrafts.blogspot.com/2012/01/whatever-goes-wednesday-101.html
http://733blog.blogspot.com/2012/01/sugar-spice-95.html
http://mygirlishwhims.blogspot.com/2012/01/your-whims-wednesday-43-and-features.html
http://www.gingersnapcrafts.com/2012/01/wow-me-wednesday-35.html
http://www.thestuffofsuccess.com/2012/01/success-u-wednesday-linkup-party-22.html
http://carolynshomework.blogspot.com/2012/01/inspiration-board-link-party-34.html
http://funkypolkadotgiraffe.blogspot.com/2012/01/too-cute-tuesday-linky-par-tay-67.html
http://www.vwbblog.com/2012/01/talent-tuesday-way-cool-linky-party_23.html
http://momommamoney.blogspot.com/2012/01/momomma-monday-link-up.html
http://mommybydaycrafterbynight.blogspot.com/2012/01/ta-da-tuesday-link-party-22.html
http://www.thekurtzcorner.com/2012/01/tuesday-tutorials-link-party-no-21.html
http://linda-coastalcharm.blogspot.com/2012/01/nifty-thrifty-tuesday-no98.html
http://singingthreelittlebirds.blogspot.com/2012/01/inspire-me-monday-good-morning_23.html
GORGIOUS!! I just finished my clutch (though I am planning on another one for the competition). I just adore yours!!! WANT! ;-)
ReplyDeleteEsther.
I saw that clutch you just posted! I love that print you used.
DeleteIt is so good!!! I have to find some vinyl, somewhere. Love it!
ReplyDeleteThanks! I got my vinyl for free from an auto upholstery shop. I just went in and asked for any scraps they would normally throw away.
DeleteRikka that is fabulous! Great to see your step by step too - and I love your big collages of photos! I think everyone is enjoying playing with Picnik premium just now!!
ReplyDeleteThanks Jill! I can't get enough of the collage feature. I've messed around with html tables and such, but picnik's collages are so user friendly.
DeleteIt looks great!
ReplyDeleteI love that shape!
Thank you! The asymmetrical elements were a simple way to add some interest. I knew I wanted the lace off-center, but when I placed it on the diagonal, I liked it even better.
DeleteThis is definitely a clutch for a night on the town!!! Perfect teamed with a little black outfit. You were brave using vinyl, as it is hard to work with and unforgiving, but it's paid off. The combination of notions works very well, as does the offset flap and lace. A fabulous evening clutch!!!
ReplyDeleteSomeone on my facebook page just suggested I use the clutch for St. Valentine's day. I just might! As for vinyl, I try to stick with simple shapes and designs. That way if I screw up a seam, I can just trim it off and try again. Sometimes my final vinyl projects are much smaller than my original designs. ;-)
DeleteThis clutch is simply gorgeous. I have never worked with vinyl before. Thank you for a tutorial on how to make this clutch. I wonder how you print the word "Ricochet" on the ribbon..did you use the iron on paper and iron on the ribbon? very pretty :) I love everything about this clutch!
ReplyDeleteThanks so much! I ordered the ribbon like that, actually. If you look at my tutorials you'll see a "tag making how-to" link. That will give you all the info on the ribbon. Unfortunately, when I iron it, the white ink disappears. Otherwise, I'd adhere it with fusible web or stitch witch. I attached the ribbon with Mod Podge for this clutch.
DeleteYou are amazing. Truly. I would have never thought to use mod podge but it totally works. The notions are a perfect combo together and your Ricochet ribbon finishes it off nicely.
ReplyDeleteOh my goodness this is gorgeous, I am a newbie at sewing so I know mine wouldn't look half as good or as elegant. Great job! I'm very impressed.
ReplyDeleteI can't believe you made that! Your clutch is wonderful...way to go!!
ReplyDelete~Tonia @TheGunnySack
Love it! I love the lace and I especially love the different studs / snaps / embellishments. The inside of the clutch is interesting too - great choice of color. The size is great!
ReplyDeleteWhat a classy clutch! I've never sewn with vinyl before...think I'll have to add that to my "to try" list. Thanks for sharing your tutorial. :)
ReplyDeleteGorgeous! I'd be SO pumped if you'd come and share this (and any other projects you'd like to show off) at the Head to Head Showdown link party, going on right now at www.icantstopcrafting.blogspot.com I hope to see you there! ~Jen
ReplyDeleteHi Rikka! Just wanted to let you know that I featured your awesome clutch on my blog! Hope you stop by and check it out !@ http://pinkapotamus.blogspot.com/2012/01/pink-hippo-party-65.html
ReplyDeleteOoohhh amazing!!
ReplyDelete