

Showing posts with label guest post. Show all posts
Showing posts with label guest post. Show all posts
Monday, November 26, 2012
2 1/2 Hour Chenille Scarf Tutorial by Linda Richards
"Ring Your Neck" Scarf Making Challenge participant, Linda Richards doesn't have a blog so I am hosting her entry into the challenge. She created this gorgeous chenille scarf and has graciously included a free tutorial. Linda has an online store called Desert Designs featuring her beautiful smocked items. Please check out her site HERE.

Tuesday, January 31, 2012
Lou's Naughty Notion Entry


Lou from Kansas doesn't have a blog, so I'm making this little post to allow you all to see some better/bigger photos of her challenge entry. Lou has this to say about herself and her entry:
"I'm a craft hobbyist in my free time.
With no time to spare. We took a week and a half off to remodel our bathroom, I mistakenly thought that I would have time to work on my clutch...unfortunately I am last minute...but I love it and the bathroom looks great! See pic below, thanks for organizing!!"


Thanks for pushing yourself to "git 'er done!"
Keren and I are so pleased to have you accept and meet and our challenge!
Happy crafting and big hugs from Montana,

Monday, January 30, 2012
Julie's Naughty Notion Entry

One of the kinda cool things about our sewing challenges is that anyone can participate, even folks without websites.

Julie is one such participant. She hails from Indiana and has this to say about herself:
"I'm a 37 yr.old Home Executive ( housewife! ) I love all types of crafts!
Here's the bag I made from a couple of fat quarters I got in an old swap, a little yarn, a cheap chain I found on clearence at Wal-mart, an old scarf, and some Gemmagic gems from Christmas 3 years ago! The bag is closed by velcro. Here's a couple of pictures I took. The inside is actually sparkly purple but the camera makes it look blue. Hope you like it! Thanks for the challenge it was fun!"


You can find Julie's purse on our voting page which will be up soon.
Happy crafting and big hugs from Montana,
Thursday, December 29, 2011
Pyramid Pouch Tutorial
This is a guest post I did for Stephanie at Toastie Studio. I am reposting it here because I am way down in TX visiting my lovely inlaws and I didn't want to let you all think I've abandoned you! This pyramid pouch is a quick and easy last minute gift idea. I can make one in about 30 minutes. You can vary the size, but make it too big and it loses it's cuteness and charm. If you make it too small, you can't get your hand inside the bag to utilize it. I love to fill a pouch with candy, a jar of my famous peach jam, and a maybe even a few ornaments or a scented candle. It's a fun, versitile, and easy so I hope you'll give it a try!
Happy Holidays!
Rikka J.

 |
| Fuse the interfacing to the backs of all the squares. The rectangles don't need interfacing. For this pouch l used med weight interfacing. The outer fabric is a corduroy and the lining is linen. You want to give your fabric enough body or stiffness to hold it's shape when it's all sewn together. A sturdy canvas or thick corduroy may not require interfacing. Batting (wadding) or fusible fleece are other good options. |
 |
Sometimes I don't cover up the ends of my zipper, but the results are well worth the effort. Your pouch will look that much more neat and finished. Plus, it's the easiest way to shorten a zipper that is too long.
|
 |
For you zipper virgins out there, this is how you get around the zipper and keep your stitches nice and straight:
Zips can be frustrating and confusing. I avoided them for a long time. There are a million tutorials out there on installing zips, so I won't go into great detail here. Basically, you repeat the above steps for all the remaining squares of fabric. Pay attention to the direction of the print on your fabric, and keep the right sides together, and you'll do fine.
|
 |
At this point, you can add things like labels, pockets, straps, tabs, etc. I kept this bag pretty simple for the sake of the tutorial, but usually I add a Ricochet label to the exterior. If you used batting or fleece, this would be the time to do any quilting, keeping your stitches well clear of the edges of the squares.
|
 |
|
 |
|
 |
| The very last step is to add something to the zipper pull. A scrap of ribbon or trim works great. Thanks for sticking with me until the very end! I know I'm long-winded, and I do apologize!
Happy crafting and big hugs from Montana,
|
Tuesday, October 18, 2011
Guest Post from Blooms and Bugs. . .
Hello Readers!
Today I have something totally new and exciting for your reading pleasure. Anshu from Blooms and Bugs has graciously offered to swap blogs with me today. Anshu is a pro at sewing and a mega-pro at working with knits and creating beautiful and fun clothes for little girls (and big girls like us!). She has an etsy store as well so I hope you will all stop by and give her some love.
Now just look at what she offered to share with us today. It is fashionable and thrifty way to turn a summer tee into a cute fall top. Now, I don't do clothing tutorials here on Ricochet and Away!, so this is indeed a treat worth savoring!
Enjoy,
 When I looked Rikka's beautiful and well-maintained blog I just couldn't help asking her for a blog swap.
She graciously agreed and here I'm, guest posting at Ricochet Away.
For this post I wanted to bring you something that would be useful to almost everyone. You know how we all are left with Tees at the end of the summer, they look and fit great but they are half sleeved, so they can't be used during the fall and winter. By the time summer rolls back again, they're too short already.
I have found myself with a pile of half sleeved clothes and wondering...Gosh!! these clothes are so nice, I wish I could use them somehow, until it hit me...adding sleeves shouldn't be that hard. After all, I do it all the time for the clothes I sew from scratch. Adding just the sleeves would be a lot more easier..and quicker.
So here's a tutorial on adding sleeves to your little one's ( or your own) tees and then adding just a little more detail to bind it all together. I'm calling it Octoberizing that Tee because a full sleeved version will be just right for the weather in the beginning of fall and also because the colors are just right for October.
When I looked Rikka's beautiful and well-maintained blog I just couldn't help asking her for a blog swap.
She graciously agreed and here I'm, guest posting at Ricochet Away.
For this post I wanted to bring you something that would be useful to almost everyone. You know how we all are left with Tees at the end of the summer, they look and fit great but they are half sleeved, so they can't be used during the fall and winter. By the time summer rolls back again, they're too short already.
I have found myself with a pile of half sleeved clothes and wondering...Gosh!! these clothes are so nice, I wish I could use them somehow, until it hit me...adding sleeves shouldn't be that hard. After all, I do it all the time for the clothes I sew from scratch. Adding just the sleeves would be a lot more easier..and quicker.
So here's a tutorial on adding sleeves to your little one's ( or your own) tees and then adding just a little more detail to bind it all together. I'm calling it Octoberizing that Tee because a full sleeved version will be just right for the weather in the beginning of fall and also because the colors are just right for October.
Supplies ( 2 year old size) 1 half sleeved Tshirt 1 XL Tshirt in a contrasting color ( or any knit fabric will do - using T shirt was much quicker because I didn't have to hem)
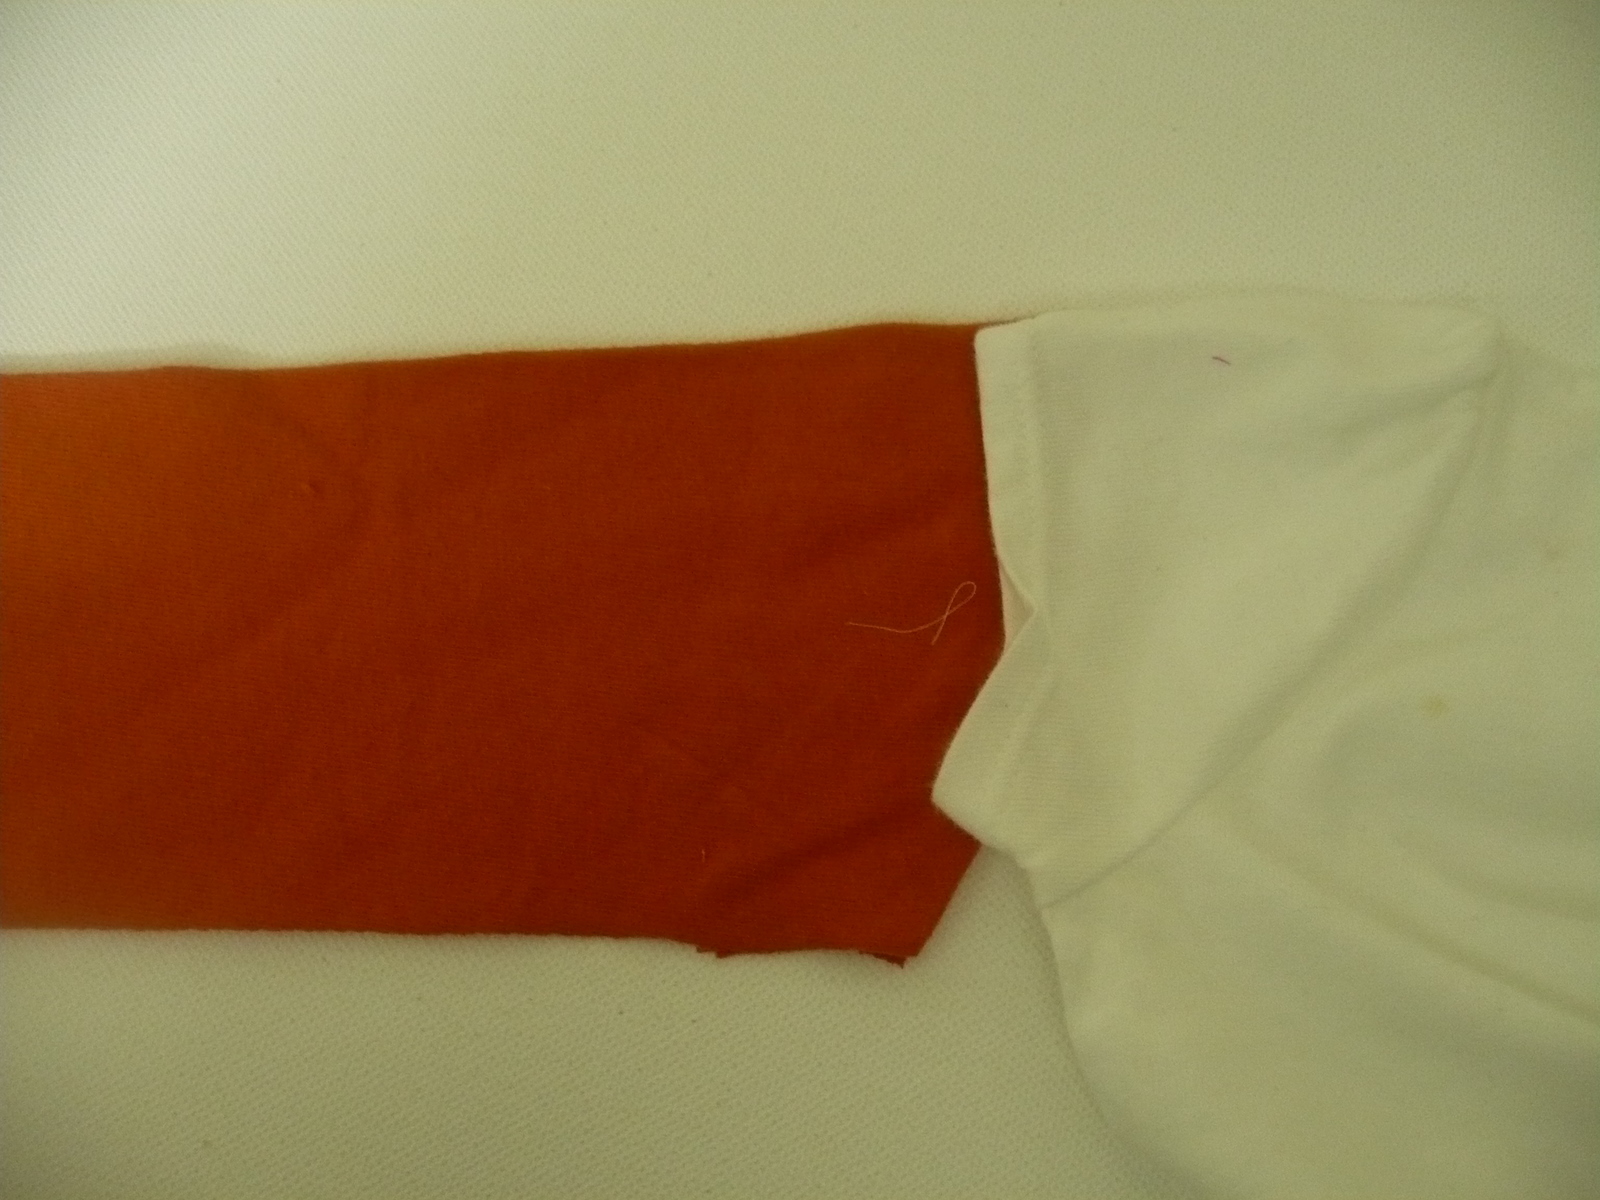
 Cut off the sleeves from the adult tee.
 Lay the small Tee straight and place the sleeves from the big tee next to the small Tee sleeves. Make sure that both the Tee sleeves and the new sleeves make a straight line and overlap about half inch. Now measure from the shoulders of little Tee to the hem of sleeves of big Tee, this is how long your final sleeve will be. Compare it with the sleeve length needed for your child.If this is too big, increase the overlap to reduce the length. If it is too small you have two options - 1 You can pick open the hem of sleeves, this will give you one extra inch. you could do rolled hems on the sleeves later.
Another option is to use T-shirt body, or a knit fabric instead of sleeves. This is not very complicated either. Just fold a knit fabric along the width and use it the same way I'm showing you using the existing sleeves. You just have to hem these sleeves...that's all.
Once you have determined the correct length you have to determine the width. What we want to do is make an addition to the sleeve that is as wide as the existing sleeve's end in and then it tapers off following natural shape of arm.
So you will measure the width using the hem of existing sleeve and add 1 inch to it for sewing margins.
Lay the small Tee straight and place the sleeves from the big tee next to the small Tee sleeves. Make sure that both the Tee sleeves and the new sleeves make a straight line and overlap about half inch. Now measure from the shoulders of little Tee to the hem of sleeves of big Tee, this is how long your final sleeve will be. Compare it with the sleeve length needed for your child.If this is too big, increase the overlap to reduce the length. If it is too small you have two options - 1 You can pick open the hem of sleeves, this will give you one extra inch. you could do rolled hems on the sleeves later.
Another option is to use T-shirt body, or a knit fabric instead of sleeves. This is not very complicated either. Just fold a knit fabric along the width and use it the same way I'm showing you using the existing sleeves. You just have to hem these sleeves...that's all.
Once you have determined the correct length you have to determine the width. What we want to do is make an addition to the sleeve that is as wide as the existing sleeve's end in and then it tapers off following natural shape of arm.
So you will measure the width using the hem of existing sleeve and add 1 inch to it for sewing margins.
 Do the same for the other sleeve.
 Now fold each sleeve in half along the width ( right sides together) and sew a seam on the side using up sewing margins. Repeat for the other sleeve.
 Turn this tube of sleeve inside out. Now line it up with the real sleeve as shown above. Now gently slide the wider end of new sleeve into the existing sleeve. Straighten both the sleeves using your hand. Make sure the new sleeve is fitting the old sleeve evenly. Use hand basting or pins to hold it in place.
 Sew a seam along the joint of the new and old sleeves to fix it in place.
Note: It is easier to go from the neckline to sew this seam, at least it was for me.
Repeat for the other sleeve.
Ta da! Your tee has full sleeves now...smile!
Sew a seam along the joint of the new and old sleeves to fix it in place.
Note: It is easier to go from the neckline to sew this seam, at least it was for me.
Repeat for the other sleeve.
Ta da! Your tee has full sleeves now...smile!
 Cut two rectangles from the contrasting knit of width equal to the width of Tee and length = 5 inches. Place them one over the other and then onto the Tee at a position you like.
 Pin or hand-baste these to make sure they stay in their place.
 Now sew parallel lines along the hand-basting. Mine are about 5/8 inch apart. You can use your sewing machine foot as a guide to get evenly spaces lines.
 Once you're done sewing, its time to cut. Cut between the seams, Making sure you're cutting only the extra layers and not the Tshirt itself. I used a small scissor to do this. Try to stay in the center between two seams but you don't have to be precise. We are taking advantage of the fact that knits don't fray. So we can leave the cut edges raw.
 Congratulations! You have successfully Octoberized your Tee. Right now the orange is looking like a color-block at the front, but these knit strips will curl up in the wash.
 So they look more like ruffled stripes of orange and white. For more pizazz you could use more layers, and also graded color layers. So when you cut, you will see colors of different intensity. I haven't done that but I think it would look cool.
Today I have something totally new and exciting for your reading pleasure. Anshu from Blooms and Bugs has graciously offered to swap blogs with me today. Anshu is a pro at sewing and a mega-pro at working with knits and creating beautiful and fun clothes for little girls (and big girls like us!). She has an etsy store as well so I hope you will all stop by and give her some love.
Now just look at what she offered to share with us today. It is fashionable and thrifty way to turn a summer tee into a cute fall top. Now, I don't do clothing tutorials here on Ricochet and Away!, so this is indeed a treat worth savoring!
Enjoy,

Supplies ( 2 year old size) 1 half sleeved Tshirt 1 XL Tshirt in a contrasting color ( or any knit fabric will do - using T shirt was much quicker because I didn't have to hem)
Adding the full sleeves:


Adding contrasting stripes at the front.


Subscribe to:
Posts (Atom)