

Recently I presented myself and my internet friends with a challenge. I challenged us to sew a garment that we would be proud to wear in public. I wanted this to be a challenge for all sewing levels so I made the stipulation that the participants needed to "try something new".
Well, I met the challenge when I created my circle top. But I didn't really push myself to try something new or learn a new skill. Sewing a garment from virtually no pattern and working with a strong print were new things, but not super challenging. So, I made another garment! I made a maxi dress, or you might call it a long sun dress. What do you think?

The 3 new things I tried with this dress were:
1. Making a dress with no pattern at all!
2. Shirring!
3. Using "Fray Check"!
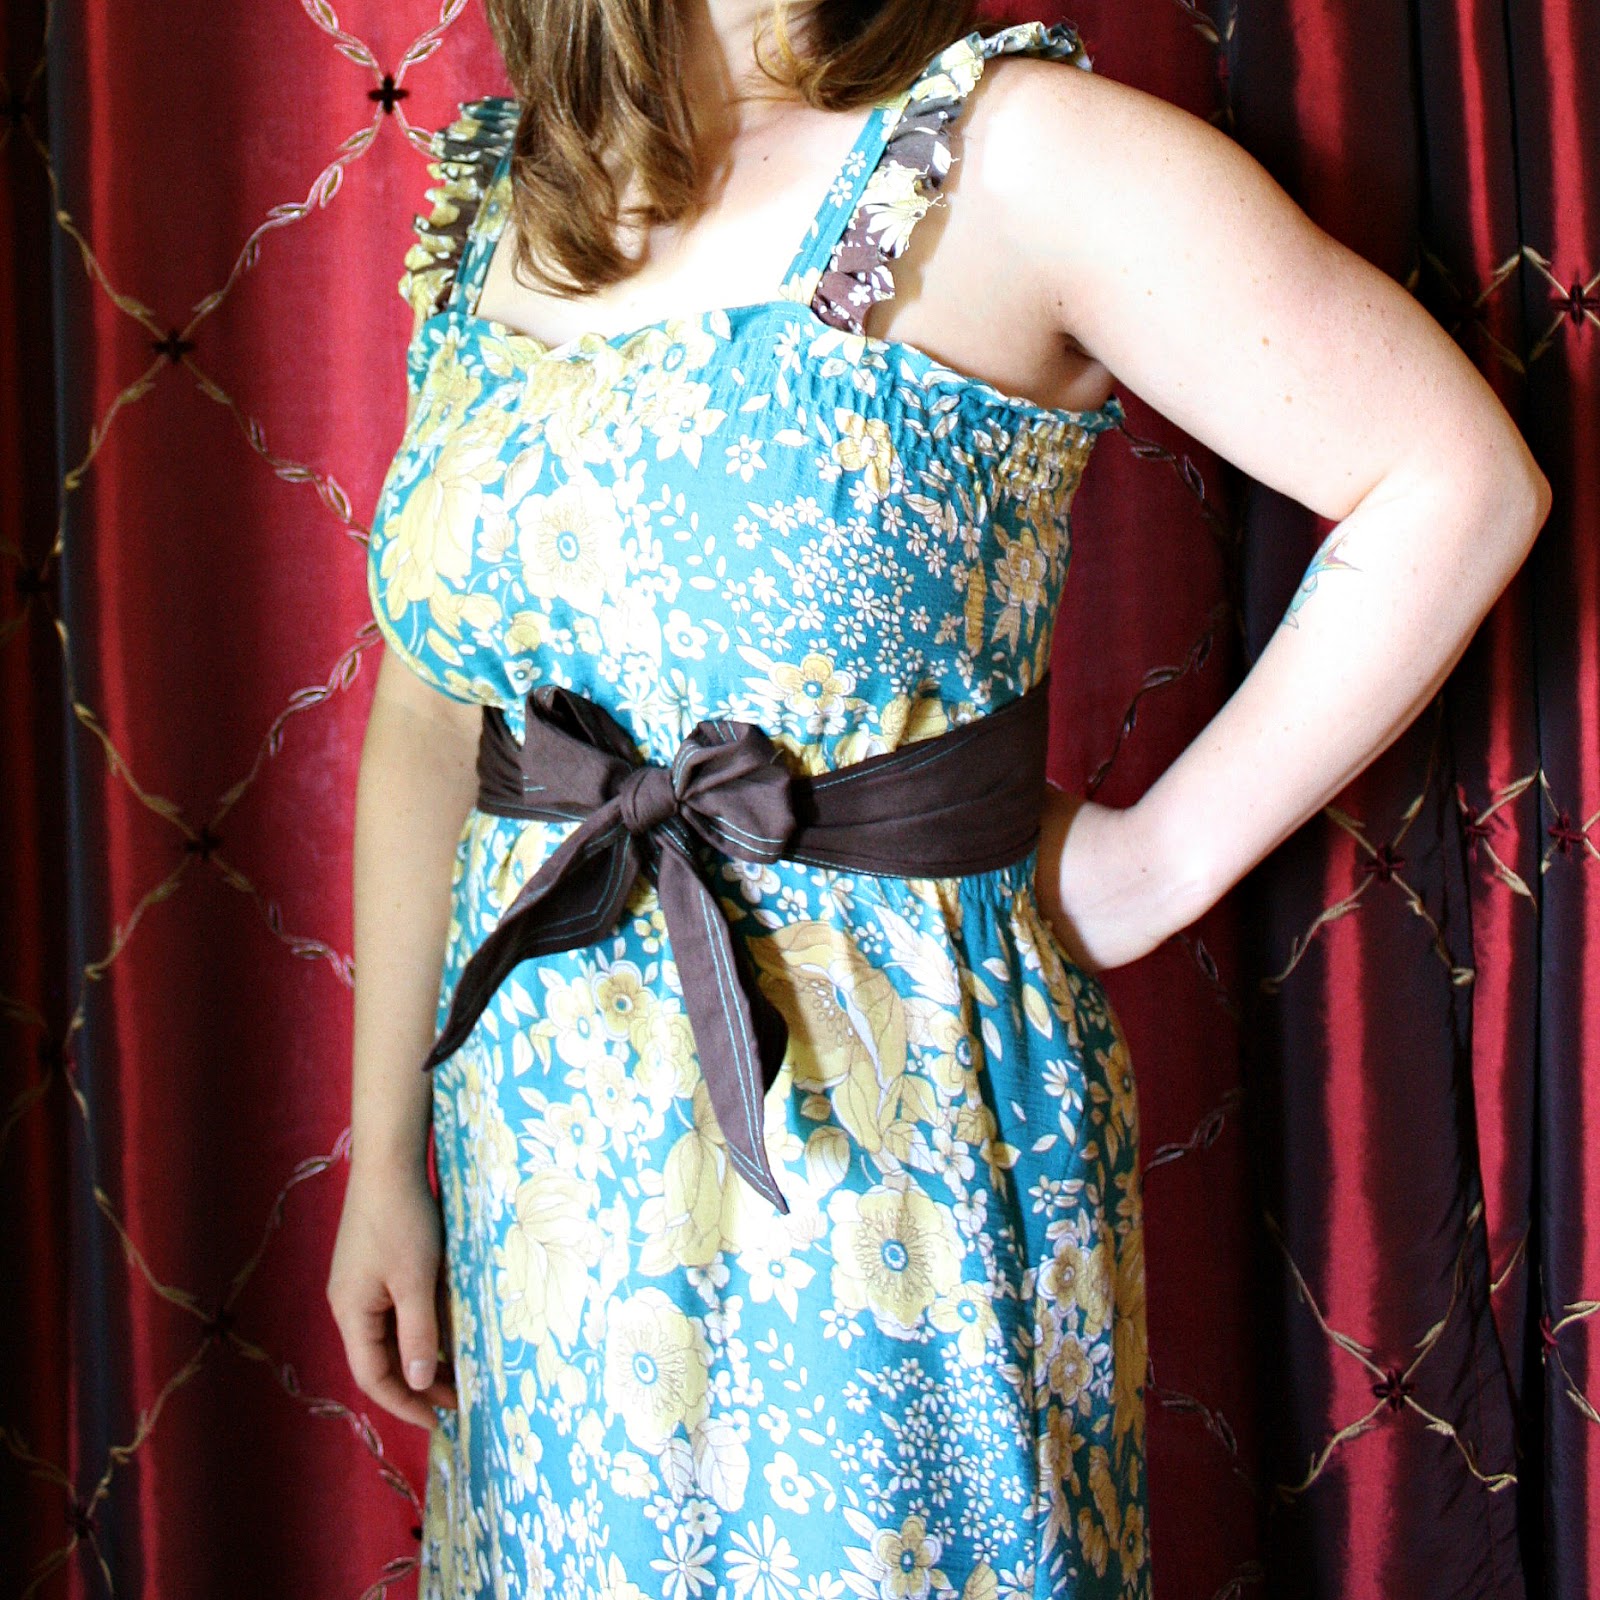
I started with a couple yards of a gauzy, crinkly, cotton floral that faded from turquoise to brown. I don't have a dress form, so I just wrapped the fabric around myself to find an acceptable width. I wrapped it loosely enough so I knew I had plenty of ease on my hips and around my ankles for walking. I gave myself an extra 4 inches of overlap--just to be on the safe side--and cut into my fabric.
I folded over the top edge twice and hemmed it. Then I began shirring. I shirred about 5 rows along the top edge. I wrapped the dress around me (the dress form!) and tested the fit. Surprisingly, it stretched all the way around me and didn't look too bad. While I had the "dress" wrapped around me, I pinned a safety pin right under my bra line. (One thing I hate about buying maxi dresses off the rack is that my chest is always too big for them.) Then I made around 5 more rows or shirring under that mark. Here's a nifty diagram I made to illustrate my point:


At this point I knew I needed straps. Hello, this girl needs to wear a bra and those strapless ones are no good for me. But I put this idea aside because I had a fit problem. With the shirring placed where it was, the front looked great. However, the back area between the shirring was loose and baggy having nothing to fill it. So I tightened it up with several more rows of shirring just in the back. Awwww, shirring is good!!!
So with that problem fixed, I moved on to the straps. I made the straps pretty much like I made the brown band, only smaller. I gathered a 1.5 inch strip of fabric and stitched it into the straps. If you'll forgive the inaccuracy of my diagram, the straps and ruffles are made from the same floral fabric, you'll see what I mean here:

The last step was to make a sash out of the brown to tie around the empire waistline of the dress. It was an addition suggested by my 5 year old daughter. A good call, I'd say. I tried tying it in the front as well, but prefer it tied in the back sans the bow.
So there you have it! If I can do it, so can you!
Here are the shirring tutorials I used:
http://www.rufflesandstuff.com/2010/02/shirring-tutorial.html
http://www.makeit-loveit.com/2011/11/sewing-tip-shirringsmocking-with-elastic-thread.html
I have a Singer HD4423 with a drop in bobbin. I wound the elastic thread by hand. I set my tension to 3. I had no problem whatsoever. Easy-peasy, I swear!
Happy crafting and big hugs from Montana,


Looks awesome, Rikka!!! Very impressive making your maxi-dress without a pattern. LOVE the fabric and brown is the perfect contrast. You'll be hooked on shirring now!!! How did you create those neat little diagrams?
ReplyDeleteThanks Pam! I used Picmonkey for the first graphic about shirring placement. I drew the folded fabric graphics with my photo editing program (printshop pro photo, I think) and finished them with Picmonkey.
DeleteThanks, Rikka. I'll have to check them both out...
DeleteGorgeous Rikka!! I've bought some elastic to try shirring - but haven't taken it out the packet yet!! You make it sound nice and easy though! :)
ReplyDeleteYour dress looks great, can't believe you did it without a pattern! Well done! Shirring is way too advanced for me, although your instructions make it seem a bit less scary
ReplyDeleteToo advanced?!! So says the quilting queen! Lol, I feel the same way about paper piecing--too advanced! I'll stick with my log cabin, thank you very much. :-)
DeleteWay cute! I love how the brown breaks it up and the ruffle straps are adorable. I am intrigued by your tattoo :)
ReplyDeleteThanks for all the great comments! Shirring was something I've been meaning to try for a long time. I'm honestly surprised how easy it was. I've read that drop in bobbins don't work so great, but it all went smooth like butter!
ReplyDeleteYour maxi dress is adorable. To think that you did this without a pattern...bravo!! I love the way it turned out, especially the ruffles on the straps and the brown accent trim on the hem and the belt. It fits you just perfectly. Will you make another one? You made it sound do able, I might try one similar. Thank you for sharing. Hugs
ReplyDeleteHi Rikka, I've featured your Maxi dress today...
ReplyDeletehttp://threadingmyway.blogspot.com/2012/06/threading-your-way-features_16.html
Looks babes, you are awesome no doubt. But more in you, your thought which show your personalty................Cool thought!!!
ReplyDeleteChiffon Dresses