Showing posts with label pouch. Show all posts

Monday, September 24, 2012

Petite Pleated Pouch

 The inspiration for this little pouch came from a another zippered pouch I saw on Pinterest:
clutch - golden wavy pleats
wavey pleated clutch yorktownroad etsy store
 I was also inspired by this quilt block:
textured quilt block TeresaDownUnder WP blog

And so I fooled around with some fabric and this little guy is what I come up with:

 I began with a long strip of this burgundy fabric.  I don't know what it's called, but it's rather thick, slick, shiny, and frays like mad.  Another cool aspect is that the fabric has a holographic effect--it looks black if you tilt it to the right angle. I'm sure it would be perfect for formal dresses or maybe a dressy fitted top. Of course I wasn't planning on making either when I picked it up out of the Red Tag bin at JoAnn's.

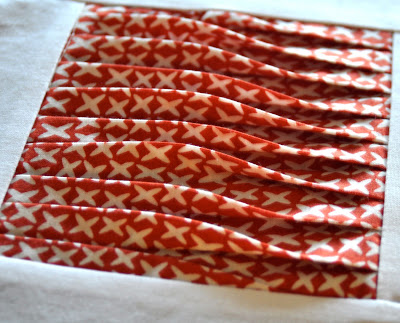
I made two pleat-cheats which consisted of cardboard strips measuring 1.25" and  0.75".  Why make 2 different sizes?  Well, tried to make then all the same size, but then I ended up with something that wouldn't lay flat.  One side of the pleat needs to be longer than the other side if you want them to lay flat like this:

Here's a handy-dandy diagram to show you what I mean:

 I stitched down one side and flipped the pleats on the other side to lay the opposite direction so I could stitch that side as well:

I added some fabric to each side and it ended up looking a lot like the quilt block I showed earlier:

I trimmed my version of the quilt block and fiddled around with it until I found something I liked.  I was really pleased with how the pleats looked when I folded the block in half.  So I set out to make a little zippered pouch.  

Now, most of the time when you make zippered pouches, you're dealing with a front and back.  This pouch I made is slightly different because the outside is all one piece.  Of course, I didn't take pics of the whole process (slapping forehead) but there are oodles of tutorials on zippered pouches.  Why make another one?  

I will say, the pouch being tiny like it is sure made top-stitching around the zipper a major pain in the arse.  I won't be trying this again in these proportions any time soon (never!).  I did finish it though, and I love how it turned out.

I made this pouch for the Fab Folds Sewing Challenge.  I host a sewing challenge every other month and September's challenge was to make something using pleats, pin-tucks, or smocking.  It's a fun way to meet new bloggers, learn new sewing techniques, and get totally inspired!  I have a challenge page you can go to on my menu bar and visit previous challenges and see what's current now.  
Fab Folds Sewing Challenge

I'm curious.  What do you know about pleating, pin-tucking, and smocking?  What have you been sewing lately?  What do you think about my Petite Pleated Pouch?  Have you ever been in an online sewing challenge?   
Happy crafting and big hugs from Montana,

Pin It


Monday, September 17, 2012

Smocking on gingham zippered pouch


My youngest turned 6 in August.  Yes.  Six!!!  In lieu of a big themed party, my daughter wanted to ride a horse for her birthday.  It was a tall order for Mr. Ricochet and me, but we pulled it off.  Our not-so-little girl got her birthday wish granted and just look how thrilled she was:


As a thank you to my horse-owner-friend, the kids wrote notes and decorated cards, while I sewed a pretty pink pouch.  You can barely see her in the photo above, but it's clear my horse-owner-friend likes the color pink.  So I found a pink gingham and a coordinating home decor canvas print to make a little zippered pouch.  Here's the tutorial: 
(Keep in mind that I sew in a basement with virtually no natural light.  
So most of tutorial photos are not even close to portraying the true colors of the fabrics.)
I'm hosting The Fab Fold Sewing Challenge this month (9/12) so I have pleats, pin-tucks, and smocking on the brain.  I decided to add a row of canadian smocking to the gingham as a fun detail.  

The photos above show how it looks on the front and back post-smocking.  I think it looks a little like french braided hair.  But with the gingham having such a strong pattern of it's own, I think the smocking also looks a bit like a puckered up wrinkle in the fabric.  That said, it turned out to be a cool looking pucker-y wrinkle that I decided to stick with.  However, next time I'm trying it on a solid colored fabric.  

The best tutorial I have found on canadian smocking can be found HERE.

After the smocking, the rectangle of gingham that I started with was obviously no longer a rectangle.  I traced that shape and cut out another piece of gingham to use for the other side of the pouch.  Then I added a band of the canvas to the bottom edges of the ginghams.  When I had both sides complete, I traced those sides on more gingham to make a lining. Then, it was zipper time.
  1. Here's a peek at how I add fabric ends on my zippers.  I sandwich the zipper in between two rectangles of right-sides-together fabric.  I pin and stitch right through all the layers.  I use a bit of blue tape to hold the edges of the zipper together on one side.  You can see all the other unconventional ways I use blue tape in sewing HERE.
  2. This shows how the rectangles of fabric have been folded back and pressed wrong-sides-together with the zipper in between.  I show more pics and explain this procedure in more detail HERE.   
  3. To install the zipper I start by pinning the right side of the zipper to the right side of the front panel.  I use my zipper foot and stitch along the edge.  
  4. This is what it looks like after the outer front panel has been stitched to the zipper and pressed away from the zipper opening.  I repeat the process for the other outer panel and then each of the lining pieces in turn.  *note: many people like to sandwich the zip between the outer fabric and the lining and make one line of stitching, but I get a straighter line of stitching if I can see the zip when I'm sewing.
  5. After all the panels (outer and lining) have been attached to the zip and pressed away from it, this is what the outside looks like.
  6. This what the inside looks like.
  7. This shows how I top-stitched all the way around the zip.  Neat and tidy!
  8. This shows some studs I added to the other side of the pouch.
After the zip was in, I pinned the right sides of outer fabric together, and did the same to the lining.  Another use for blue tape: a reminder to leave an opening in the lining so I could pull the bag right-side-out.
After stitching around the perimeter, I worked on making a flat bottom for the pouch.  The next photo down shows how I squared off the bottom of the bag.

  1. Here's the opening I left in the lining.  I folded back the edges and pressed them back to line up with the seam on each side.
  2. Here's the bag lining right-side-out.  The creases I ironed on the edge of the opening make it easier for me to stitch the hole closed.

I squared off the bottom of the bag by lining up the side seams with the bottom seam.  
I pinned the corner, marked and stitched across as show, and then I trimmed off the corners.  
I did this to the outer and lining fabrics.  Now the bag will sit flat.
I printed out a little picture of horseshoe and carefully cut it out.  Then I used Glitter Mod Podge to adhere it to the front of a clear plastic pendant.  I used Dimensional Magic to add a thick glossy finish over the horseshoe.  I let it dry overnight and used it as a zipper pull.  I've heard you can just add regular glitter to Mod Podge for a similar effect, but the pre-made Glitter Mod Podge is very pretty.  It's not just silver glitter, it's very fine-sized iridescent glitter--super glam and rainbowlicious!


So here it is, all finished and shown from a few different angles.

I'd love to hear from you, so leave a comment and tell me about what you're working on, what your zipper tips are, or how you celebrate birthdays at your house.

I would also like to invite to join us in The Fab Folds Sewing Challenge during Sept. '12.  If you're reading this after September, just check out my challenge page and see what the current challenge is.
Fab Folds Sewing Challenge

Happy crafting and big hugs from Montana,
Pin It
Related Posts Plugin for WordPress, Blogger...