Showing posts with label quilts. Show all posts

Thursday, February 28, 2013

Winners: Curved Seams Challenge!


We spent the month of January working on projects that include curved flat seams.  And we spent the month of February voting on our favorite projects.  Please visit the voting page and check out the finished projects. You'll see that choosing a favorite was very difficult considering the high quality of the entries.

I'd like to take a minute to thank all the participants who make these challenges so darn fun.  Everyone has always been such a good sport and so open to new concepts and techniques.  Everyone has been so forgiving of my screw-ups and patient when I'm not able to stay right on top of things.  You all inspire me so much and make this whole sewing/blogging experience more rewarding than I ever imagined.

Thank you!!!!

Without further ado, let's hear a round of applause for the entry that received the most votes:
Pam from Threading My Way made a dress featuring  wavy curved seams in the skirt.
She blogged about it HERE.
Congrats on winning the gold badge.
Your bragging rights are fully instated! 

Congrats on winning the GOLD!


The silver badge goes to:
Fiona from Celtic Thistle Stitches completed a two-sided tablecloth.
I attempted to brighten/lighten this photo, so the colors aren't true--apologies!
See the original photos in Fiona's blog post HERE.
Congrats on winning the silver badge.
Feel free to brag away!
Congrats on winning the SILVER!

And our bronze badge goes to:
Caroline at Artfully Caroline was able to finish 2 curved seams projects.  She blogged about them HERE.
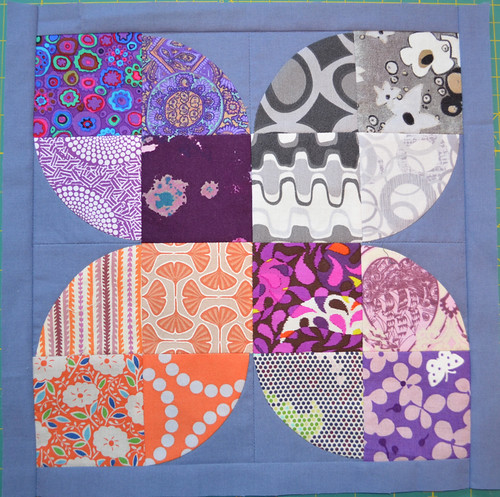
The first project was this pretty pillow using the drunkard's path quilt block.  
Congrats on winning the bronze badge.
Bragging rights are yours!
Congrats on winning the BRONZE!


If you're interested in honing your sewing skills, meeting crafty folks from all over the world, and/or trying sewing new, please consider joining March's challenge:

Visit Fancy Feet Homepage

Happy crafting big hugs from Montana,

Pin It
Before you click away, I'd like to invite you to join in my current sewing/craft challenge.  

Friday, January 25, 2013

Quilted Tote Bag Tutorial


My Curved Seams Challenge project is finally done!  I posted about the beginning stages of my project HERE.  I used a great tutorial by Leanne at She Can Quilt.  Leanne also includes a video--how nice is that!!!
So I made my own template, followed Leanne's instructions, made 8 drunkard's path blocks, sewed them into 2 big blocks, and then bordered the blocks with 4 inches of grey fabric.  Here's a pic of my 2 panels:
They were rather large 20" square panels, one for each side of my tote.  

Now, I have blogged about quilted totes before HERE.  I gave pretty good instructions on how to assemble the totes, but I came up with some new tricks in constructing this newest tote, so I thought I'd share them with you.  

If you'd like to have a flat bottom on a tote without adding a separate gusset, you have to match the side seams to the bottom center and stitch through the corners.  I explained this step in detail on my previous quilted tote tutorial.  You can see from the pic below that the overall shape of the bag changes drastically according to how much corner you cut off:
 When you start with square or rectangle front and back panels, the resulting shape of the bag is no longer square or rectangular after you create the bottom this way.  The top opening will always be wider than the width of the bottom.  HOWEVER, if you start with a trapezoidal (triangle with it's head chopped off) you can end up with a rectangular tote bag with a nice flat bottom!
So, I trimmed each of my panels so the top width was 4 inches shorter than the bottom width.  Or more simply put, I cut from the bottom corner to a mark 2 in. from the top corner on each side.  Was that simpler?    Perhaps this picture will be more helpful: 

I made the sandwich of the top panel, the batting, and the lining panel for each side, and then I machine quilted through all the layers.  The first panel I quilted in concentric circles.  I loved the effect, but all the stopping and starting was tedious.  On the other side I made one big spiral instead.  The effect was just as good and the quilting went much faster:

Another something new I tried with this tote was to add an interior pocket.  You can see the stitching on the outside of the bag, but I didn't think it was too distracting.  The alternative was to stitch it in by hand and I wasn't up for that.  Here's a couple pics of the pocket:

Next, I trimmed up the panels and attached them right sides together with bias tape.  I finished the top edge of each panel first, and then placed the panels together and finished the side and bottom seams.  I didn't bother with neat finishes on the bottom corners because I was just going to cut them off later anyway:

Here's some pics of how finished the corner seams.  Let me know if you have questions:

I added the handles, and the tote was done!  The most trying part was the quilting.  I have no patience for quilting and it ruins my back.  The best part was finally getting to try out some curved seams!  So here are the glamour shots of the finished tote.  I even pulled it inside out so you could see the inside.  I love the pallet and the mix of patterns.  I was into black and browns for a while, but grey is definitely my new favorite neutral.  I just love it with everything!


Here's a good shot taken by Mr. Ricochet.  You can see that starting with the trapezoidal shaped front and back panels resulted in a very rectangular-shaped bag:

You can learn about the Curved Seams Sewing Challenge here:
Curved Seams Challenge Homepage

Happy crafting and big hugs from Montana,
Pin It
Before you click away, I'd like to invite you to join in my current sewing/craft challenge.

Since this whole curved seams thing is new to me, I'm linking up to Celtic Thistle Stitches' New to Me in 2013 link-up party!  It's a great party to share what you've learned and get inspired by others' projects.

Tuesday, January 15, 2013

Curved Seams Challenge WIP Update

 I gave myself the deadline of Jan. 15th to come up with a project for my Curved Seams Challenge.  Yesterday, Jan. 14th (one whole day early!), I decided to make a quilted tote bag.  I even finished the front and back panels.  They turned out pretty funky.  They will not be everyone's cup of tea, but they sure are mine!  If you've been reading for a while, you know how much I love the color green, and how I love to experiment with mixing prints.  I'm already excited about this tote and I probably still have 2 more afternoons of work to do on it.

I've been so obsessed with the drunkard's path quilt block that I just had to try it out for myself.  I experimented a bit with scrap fabrics, trying to find the easiest way to create the template myself.  I figured it out eventually, made these:

Then came time to pick out the fabrics.  I had some nice quilting fabric in a rich solid green so I started with that.  I added a stripey green pillowcase, some shiny/slinky polyester in a '70s print, and a bright yellow solid that used to be the curtains in my son's nursery.  Hindsight is 20/20 and I never should have added the silky print.  I don't know what I was thinking.  OK, I know what I was thinking!  The print was so retro and cool and the colors were perfect.....I figured I could MAKE it work.  I tied it all together with a heavy weight grey cotton fabric.  Green is my favorite color, but grey is my favorite neutral!  I'll use the grey for the bottom, sides and handles.  


The first thing I did to MAKE the silky fabric work, was to add some lightweight fusible interfacing.  My reasoning was that it would then only have one slippery side.  My logic was faulty, of course.  Sewing is all about placing right sides together, and the slippery side is right in this instance.  


The silky fabric is synthetic and doesn't like the hot iron I needed to press the cotton fabrics down.  It also got all bunchy and puckered up on the curved seams.  I'm guessing this was because the top and bottom fabrics weren't feeding at the same rates.  Probably I should have used my walking foot....  Again, hindsight is 20/20.


In spite of the wonky seams, I pressed on and finished two 16 inch square panels that will make up the front and back of my tote.  The puckering won't be so noticeable once the panels have been quilted.  I hope....

I'm going right to the sewing room after I post this, so I can start on the quilting.  I'm thinking concentric circles....but I'm apt to change my mind.

There are still two weeks of challenge time left.  If you'd like to give it a go or read the guidelines, click this button:
Curved Seams Challenge Homepage

Happy crafting and big hugs from Montana,
Pin It
Before you click away, I'd like to invite you to join in my current sewing/craft challenge.  

Sunday, December 16, 2012

Curved Seams Sewing Challenge Jan 2013


Curved seams.
I've never tried them before, but I've been wanting to ever since I first saw the popular 
drunkard's path quilt block.  Here's a beautiful example of the drunkard's path block in action:
[I found this pillow at Made On Main Street]
And here's another way to arrange the blocks:
5 x 4 Modern Bee - Block for Megan - Hive 12
[I found this block at She Can Quilt]
I'm excited and eager to add this technique to my bag of tricks.  I hope you are too!


If you're new to my sewing challenges, you can visit my challenge page and visit all my previous challenge homepages.  Basically, I provide a challenge and participants attempt to meet it.  

The focus is on:
  • committing ourselves to learn/try something new,
  • to step outside our sewing boxes, and 
  • to meet a reasonable deadline   
It's always fun and inspiring, and it's a great opportunity to meet other creative and crafty people.  After the challenge is over, we vote on the finished projects and the winners receive bragging rights and a fancy blog button.  You think this might be something you'd be interested in?  Keep reading!


Rule #1
Make a something new with curved seams and finish it by Jan . 31, 2013.

Rule #2
By curved seams, I'm referring to flat curved seams like you would see in a drunkard's path quilt block.
I presented the drunkard's path quilt block as inspiration, 
but as long as your project has one or more curved seams, it qualifies.

Rule #3
If you're already an expert on curved seams, please challenge yourself to use this technique in a new way. 
This is a great opportunity to go crazy and get really crafty--so go for it!


Now thru January 31, 2013
Time to sign fill out out the sign-up form below and finish your project.

February 1-28, 2013
Our just-for-fun poll takes place.

Mid February, 2013
A new challenge for March will be announced.

First week of March, 2013
Winners of the poll are announced and will receive bragging rights and fancy blog buttons.
Sign-up for March's challenge begins.


Visit my FAQ page HERE.


Curved Seams Challenge Homepage

Curved Seams Challenge Homepage


I like to make a Pinterest inspiration board for every challenge.
All the challenge participants can be added as contributors.  
It's an easy way to share links, techniques, and ideas.
January's challenge board:
Previous challenge pinboards:


  • Ring You Neck Inspiration Motherboard!
  • Fab Folds Sewing Challenge
  • 2-in-1 Sewing Challenge
  • Garment Sewing Challenge
  • Solids-Only Tote Challenge
  • Naughty Notions Challenge
  • Typography Challenge


  • Visit Threading My Way!


    Visit Play Sculpt Live!


    Visit Artfully Caroline!

    Visit Celtic Thistle Stitches!


    Happy crafting and big hugs from Montana,
    Pin It

    Related Posts Plugin for WordPress, Blogger...