Showing posts with label nonsewing. Show all posts

Sunday, March 24, 2013

I Painted My Vinyl Floor


Can you  paint a vinyl kitchen floor?  Should you paint a kitchen floor?  How do you paint a kitchen floor?  Would painting the floor be worth the effort and time?

I struggled with answering those questions.  I came to 2 conclusions: 
1.  I really couldn't make it any uglier!
2.  Eventually we're going to install real tile anyway.

Just to give you an idea of my kitchen/dining-room  floor plan, I made this simple diagram.
The black represents floor covered in counter-tops, fridges, etc.
The yellow is my ugly vinyl flooring.
The grey is carpeting (yuck!).
Eventually, we're going to rip everything out and tile the whole thing,
but that project is possibly years away.

So you can see that I really didn't have a ton of vinyl flooring to paint.  Considering the back-breaking and mind-numbing work required in painting the small area of flooring I DID paint, I would never consider painting and stenciling a large area.  I have a new found respect for all you crafty people who painted and stenciled entire rooms.  Wow!  What a lot of work!

My inspiration!  Check out this fab post by Shabby Coast Cottage!
[Photo by Shabby Coast Cottage]


painting wallpaper lines
I got my stencil and learned the technique from this lovely post by JDC.  
[Photo by JDC]
TL: Primer | TR: Floor paint
BL: Tracing stencil | BR: Painting stencil

Here are the steps I followed to paint my floor:
  1. Removed drawer under my stove. (mine's not a broiler)
  2. Cleaned the floor with ammonia and rinsed it well.
  3. Sanded the floor with 150 grit sandpaper.
  4. Vacuumed and wiped up all sanding residue.
  5. Taped off edges, trim, and bottom of fridge.
  6. Painted on a layer of KLEAN-STRIP EASY LIQUID SANDER.
  7. Painted on KILZ 2® Latex Primer.
  8. Painted on BEHR PREMIUM® Porch & Floor Paint--2 coats.
  9. Traced stencil guidelines with gel pen.
  10. Stenciled in BEHR PREMIUM PLUS ULTRA® Semi-Gloss Enamel.--2 coats. 
I bought some clear varnish to use as a top-coat but have yet to apply it.  It's been several months since I've painted the floor and it's holding up so nicely, I doubt I'll ever paint on the vanish.  

Here's a couple more "afters": 
The texture of the floor is still evident, but I like it soooooo much better.  I mostly clean the floor with warm water.  When that isn't enough, I have a swiffer thingy that I use and it works great.  

How about you all?  Would you ever consider painting your kitchen floor?


Happy crafting and big hugs from Montana,

Pin It
Before you click away, I'd like to invite you to join in my current sewing/craft challenge.  

Friday, March 15, 2013

Plaid Stencils and Folk Art Craft Paint Review


Besides connecting with amazingly creative people from all over the world, the second best thing about being a blogger is getting opportunities to review craft products.  This post is about my experience with FolkArt stencils.  I've been a big fan of Plaid brand products even before I began blogging.  You see, I'm a Mod-Podger from waaaaay back!

These are all my projects featuring Plaid products:

Most of those tutorials feature projects using either Mod Podge or various brands of acrylic craft paint.
Besides the Patches for Girls post, I haven't worked much with stencils...until NOW!

paint, stencils, handmade charlotte, plaid, folk art


Happy crafting and big hugs from Montana,


Connect with Plaid via these social media links:
Plaid on Facebook
Plaid on Twitter
Follow Plaid on Pinterest

Friday, January 18, 2013

Cleaning the dirtiest iron


How dirty is your iron?  When was the last time you cleaned your iron?


Yikes!  This iron came with my husband who got it over a decade ago.  As far as I know, I'm the first person to clean it.  Sad, right?  I have no excuses.  I'm just a lazy procrastinator.  Yes, I am.

I have been pinning various iron cleaning methods, and decided it was time to try some out.

First up is salt:


I poured some salt on a towel and ironed over it on a medium heat setting for several minutes.  I noticed some cleaning was occurring, but the results were less than satisfying.
It was working though. You can see how dirty the salt got:

Next up was dryer sheets:


I tried both new and used dryer sheets with the heat setting on low to medium.  I put a white piece of paper between my ironing board and the dryer sheet.  As you can see, some grime was eventually transferred to the dryer sheets:
However, after griming up 4 dryer sheets, I couldn't see much of a difference in the surface of my iron.

Next was steel wool:
 I didn't find a pin using steel wool, but I figured I needed something abrasive to get this junk off.  I just spread out a thin layer of steel wool on a sheet of paper and ironed over it, rubbing back and forth and in circles.  This method showed the most significant cleaning power, but my arm was getting tired by this time and the going was so slow.

What worked?
MAGIC ERASER:


2 minutes with a damp Magic Eraser on a cool iron and the whole stinkin' thing was shiny and clean!
I used up half an eraser, but it was much faster and easier than any other method.  
Just look at the difference:

I promise I won't allow my iron to get this dirty EVER AGAIN!!!

How about you guys?  How dirty is your iron?

Happy crafting and big hugs from Montana,
Pin It
Before you click away, I'd like to invite you to join in my current sewing/craft challenge.

Since this is a first for me (and my iron!) I'm linking up to Celtic Stitches' New to Me in 2013 Linky Party!

Monday, January 7, 2013

Freezer Paper Printed Placemats


Way back last summer, I started some quilted placemats for our table.  I started 8 placemats and finished 2 which I proudly gifted away to our dear cousins.  I called the 2-sided mats Mullet Mats:

[read this post]
So I finally finished the last 6 placemats!!!!  It only took about 6 months!!!
The mats are reversible with one "fancy" side comprised of patchwork:
The other, "utilitarian", side is printed with a place setting:

Growing up, the proper placement of silverware and napkins on the dining room table was not enforced.  In fact, I remember most of our meals were self-serve from the kitchen stove, and we brought our plates and forks to the table or to the couch in front of the TV.  My first encounter with place settings was at Girl Scout Camp, where I thought the whole ordeal was a pointless ritual.  

It wasn't until I was grown, married, and had my first child that I committed to eating all meals at the table.  Why the change of routine?  Being a new mom, I was reading everything I could get my hands on about raising kids.  I noticed that nearly every source recommended eating together as a family every day.  So I did.  (Mr. Ricochet was less than keen about missing his dinnertime show, but he eventually came around to my way of thinking.)  

After 8 years of this routine, I can tell you my 8 and 6 year olds have excellent table manners.  They are deft at buttering their own bread and cutting their own meat.  Plus, we can rarely go out to dinner anywhere without someone coming up to our table and commenting on how well mannered and polite our kids are.  The biggest benefit by far is maintaining a connection with each other.  We love dinner and not just because it's a prelude to dessert!  

The kids have been  setting the table for some time now, and these new printed place mats have injected a little fun into the chore.  They remind the kids to cut with their right hands too--something that tends to slip their minds from time to time.  

I made printed on these mats using a freezer paper stencil, something I'm sure you've all heard of before.  Used to be freezer paper was for wrapping up your meats.  But some brilliant (seriously clever) individual found out one could iron freezer paper to fabric (and use it over and over again!), it moved from the kitchen drawer to the craft room in a hurry!
[source]

 I have never used fabric paint, so I can't comment on whether or not acrylic craft is better or worse for printing on fabrics.  I can say that my results are wonderful, and the print still looks great after a few machine washes.  The paint I used was a pearl variety by Martha Stewart:
It used to be acrylic craft paint was for painting birdhouses and the like,but nowadays I'm finding all sorts of alternative uses for craft paints.  Maybe you've read my tutorial on No Dye Tie Dye?
paint your own birdhouse
[source]

I started this project by drawing out my place setting on a sheet of freezer paper:

 After carefully cutting out all the shapes, I ironed the paper to some fabric.  
Note how I treated the fork and napkin differently than the rest of the flatware.
I also added a circle within the plate just to save paint:

And here's what I ended up with after pulling off the freezer paper:

And here's 4 mats that are complete:

Here's a better photo taken in natural light so the colors are true:

The "pearl" of the paint is subtle.  It has an almost reflective metallic quality when the light hits it just right.  I'm pleased with the results.  I'm excited to show off the "fancy" patchwork sides next time I have my friends over for coffee.  

How about you all:
Where did you eat meals as a kid compared to now?
Have you ever tried the freezer paper stencil method for printing on fabric?
I love freezer paper for drafting sewing pattern.  What do you use it for?

Happy crafting and big hugs from Montana,
Pin It
Before you click away, I'd like to invite you to join in my current sewing/craft challenge.
linking up here:
http://www.salttree.net/2013/01/open-call-tuesday-36.html

Thursday, December 13, 2012

Blog Makeover!


Maybe you've noticed things are looking a little different around here?  No?  Well then you must be new!

Wednesday, December 5, 2012

DIY Foam Ball Ornaments


When I was in Girl Scouts (many years ago!) we hosted an annual Christmas Bazaar for the community to buy & sell their crafts and baked goods.  One year my troop made ornaments to sell.  We started with ready-made satin-covered foam ball ornaments.

Thursday, October 25, 2012

Scarves with Prints


One of the rules I made for November's Ring Your Neck Challenge is that sewing is optional.
Another rule is that you must try something new.
So if you aren't going to sew, let me suggest trying some fun dying and printing techniques:


Dali Border Dipped Scarf Indigo white, indigo, women's scarves
This fine wool scarf was dip-dyed
in indigo--a lovely effect.
[source]
scarves-mld108832.jpg
I found these dip-dyed scarves
on the Martha Stewart website.
[source]
Virginia-johnson-shawl
These striped shawls by Virginia Johnson
are bright and fun.
[source]
Designer, Maria Alexandra Vettese has printed photographs
of the the sky on silk scarves.  Breathtaking!
[source]
about upstate
quoted from their website:
"about upstate: 
kalen and astrid design garments utilizing their 
own take on shibori* and dip dyeing. 
each item is hand dyed and one of a kind."
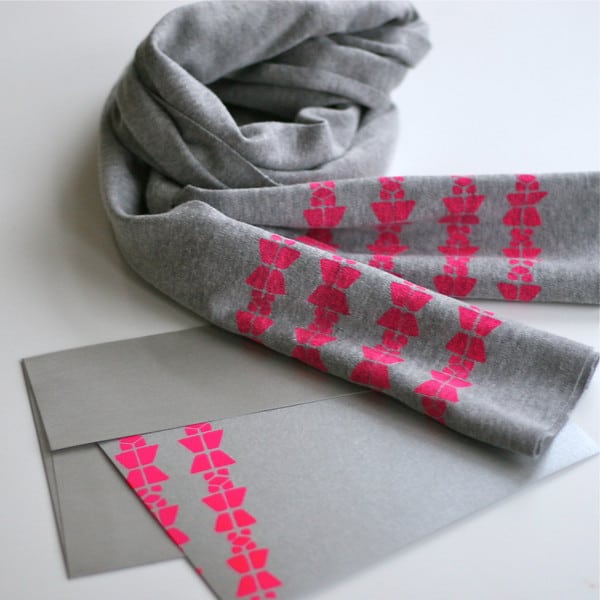
A fun freezer paper print on a jersey scarf
by Ashley Weeks Cart.
[source and tutorial]
Image
These scarves from Bali would be fun to try.
Whether you do a wax resist dye or handpainting
or freezer paper stencil....
[source]
A silk-screened scarf by the folks at Prudent Baby.
[source]
This cool "Quote Scarf" by The Fashion Planner
was made with a sharpie.  I want to try it too!
[source and tutorial]
how to make a galaxy scarf
Stacie at scarves.net gives a great tutorial on how make a
"Galaxy Scarf"
[source and tutorial]
Here's another great freezer paper stencil
printed scarf.  This one is by Jessica Jones
from How About Orange.
[source and tutorial]

So do you have a favorite you want to try?
Anyone is welcome to join the scarf challenge.
You can sign up HERE.

Happy crafting and big hugs from Montana,

Related Posts Plugin for WordPress, Blogger...