Thursday, April 19, 2012

Welder's Hat: I found a free pattern!

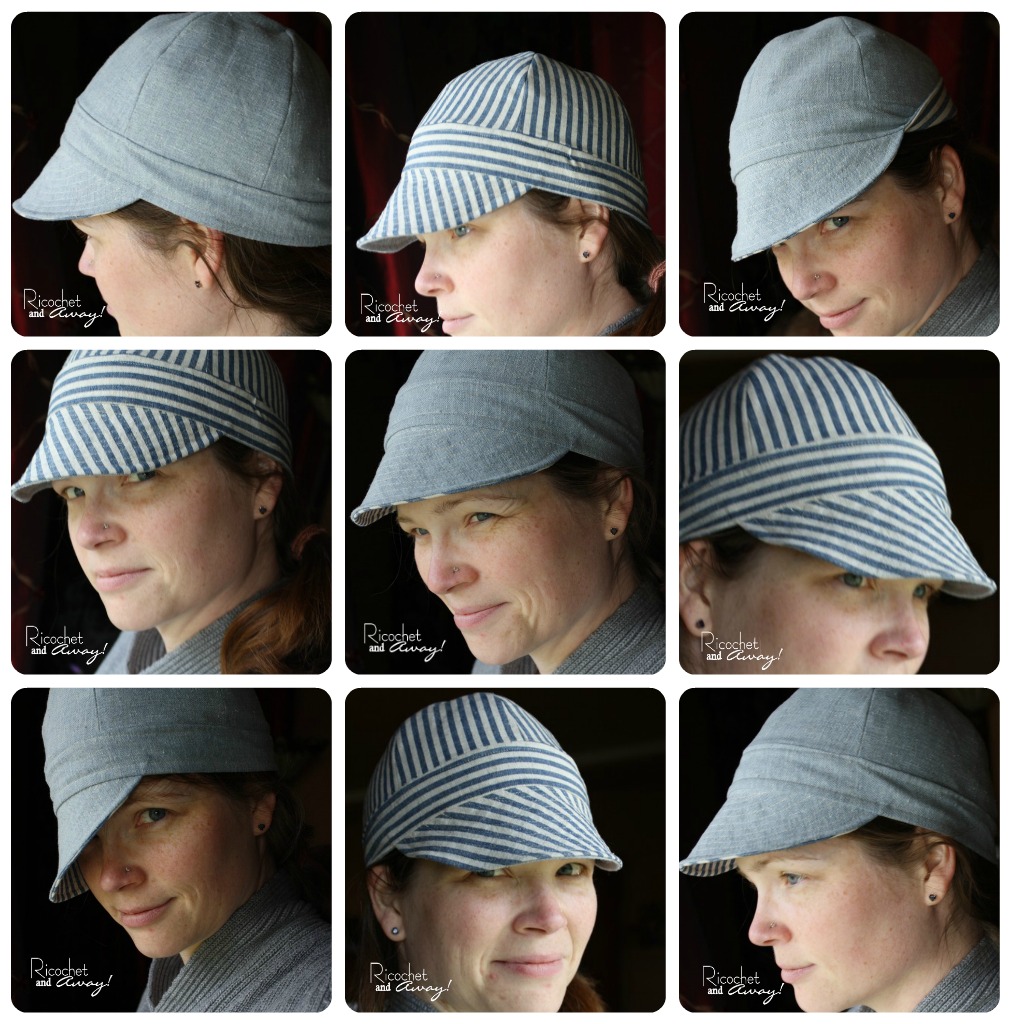
So here I am with NO MAKE-UP wearing a welding cap and trying to take photos of myself while posing in front of our big picture window.  The neighbors, leaving for work, pause for a moment as they try and figure out what the heck I'm doing.  I'm a 35 year old SAHM of two, and I can take pics of myself in full view of the neighbors if I want to, I tell myself.  I'm just so excited to share this cool new free pattern that I found. I feel like there is no time for mascara and waiting until the afternoon sun is high enough to shoot photos in the back yard.  This needs to be done now.  So there you have it. ;-)

welding
[Photo Credit: www.skinnermetalproducts.com]

Perhaps you'd appreciate a little background first?  If not, scroll down a couple paragraphs because I'm feeling wordy this morning!  To begin I should tell you that my father is a welder as well as my brother and a couple of my cousins.  That is how I came to be searching the web for a sewing pattern in the first place.

One mark of a good and safe welder's cap is that it is made of 100% cotton (linen may work as well).  That makes sense because we all know that synthetics like nylon and polyester melt when exposed to heat and flame.  Also, as you can imagine, welding is a hot job and a breathable, absorbent material like cotton is preferable.  One's hair and back of neck are exposed when wearing a welder's protective mask.  The cap part of a weldering hat is made to stop the sparks from burning hair while the soft, short bill is turned around backwards to cover and protect the neck.  And lastly, the adjustable halo straps of a welding mask are made that much more comfortable when cushioned by a welder's hat.

And besides all that, I think welding hats are cute!  What do you think?  Can you imagine what they would look like with a few fabric flowers, yo-yos, buttons, and broaches to fancy them up a bit?  Welding hats could really be fashionable.  The cap part is deep so it will cover a lot of square inches of hair.  It was a little too deep for me and my pony tail so I folded the back of the hat band up in the back.  This revealed a peek at the fabric of the reverse side and let me wear my pony tail a bit higher.  I think it's a cute look.

OK, now onto the the DIY part of this post!  I found a w-o-n-d-e-r-f-u-l FREE pattern online.  Special thanks to fellow flickr member Seamingly Simple!  You can find her ingenious pattern HERE and the instructions HERE.  Or you can find it on PatternReview.com HERE.  Did I mention the hat is REVERSIBLE?  No?  Well, it is and that's another pretty cool thing, right?

What you'll need:

  1. The printable pattern.
  2. 1/2 yard of fabric. (1/4 yard for each side since it's reversible)
  3. A scrap of thin quilt batting OR interfacing for the bill.  I didn't use either in the hat I made for myself because the fabrics I chose were of a heavier weight.  I used Craft Bond fusible interfacing in the bill of the hat I made for my son.
  4. Coordinating thread.  (contrasting thread might be fun for the top-stitching)
  5. A little time.  The first hat took me an hour start to finish, but second one took me only 30 min.
Some tips that I found helpful:
  • Cutting the bill fabric on the bias is not necessary, but I like the look and how it lays nice and flat on the curved seam.
  • The instructions concerning construction of the crown were confusing to me.  I ended up making 2 bowl-shaped caps, attached the bill to one of the bands, and then attached the bands to the caps.  From there I stitched the two hats together, right sides together, around the the bottom of the band.  I left an opening and pulled the right sides through just like when I attach the lining to a purse.
  • I trimmed the seam allowances of the curved seam of the bill with pinking shears.  That just seemed easier than cutting out a bunch of little notches to ease the curve.
  • The "scale bar" on the printable pattern is ingenious!  Just so you know, if you print it out at 100%, the scale bar measures 10cm and the pattern is perfect for a 25" head.  If you print it out at 96%, the scale bar measures 9.6cm, at 93% it measures 9.3cm and so on.  You can totally customize this pattern to fit ANY head size.  

My son likes his hat, but suggests I make another one for him using "tougher, boyish" fabric!


This hat reminds me of a page boy cap, one of my fave styles.  Here are a couple page boys I found online.  I bet the welder's hat could be modified a bit the emulate one of these:
Burberry Wool Duffle Cap
[source]
Here's a similar hat that I found from Nordstrom.
Shorten the bill of the welder's hat and make it out of tweed?

[source]
This is a pageboy hat from TJ Maxx.
Make some fabric buttons to decorate your welder's hat?

Happy crafting and big hugs from Montana,

Pin It
If you're here in April 2012 vote for your fave Typography Challenge entry:
Typography Challenge Poll

If you're here before June 1st, 2012 please check out the "I'll wear it in public!" sewing challnege:
Garment Sewing Challenge: May 2012

Tuesday, April 17, 2012

Prepping for warmer weather


Thanks to Walgreens for underwriting this post. I was paid as a member of the Clever Girls Collective, but the content is all mine. Visit http://www.discoverbeautywithin.com/.


Now that Spring has sprung, I'm thinking about warm weather activities and events.  The time for backyard BBQs, wedding showers, and farmer's markets will soon be upon us.  For myself, that means it's time to start prepping my freakishly white legs for the public!

product image
[source]
I am fair skinned and freckly and for many years my relationship with the sun has been a cycle of burn-blister-peel-freckle-repeat.  Eventually I wised up and haven't subjected myself to a bad sunburn in several years.  (knock on wood!)  Considering my complexion and genetic predisposition to skin cancer, tanning never really was in the cards for me.

However, my legs in their natural state look much like a road map.  Many years of standing on concrete, having children, and genetics have left me with significant spider and varicose veins.  Being so fair complected really accentuates those veins.  And so I entered the world of sunless tanning lotions.

Years ago, sunless tanning products were very expensive and not so good.  Often I'd pay over $15 to have rusty colored streaks on my legs and dirty-looking knees.  Not anymore.  Now there are lots of options available at your local drug store and most of them are very good if used correctly.

Self-tanning Lotion Must-dos:
  1. Exfoliate.  
  2. Avoid ankles, heels, and knees.  
  3. Wash hands after application.  (don't forget under your rings!)
  4. Keep up with your self-tanning routine.

As long as I follow those four steps, I'm happy with the results.  I've been using Jergen's Natural Glow Daily Moisturizer for a few years now, and am hooked.  What are your favorite brands of self-tanning lotions?  Do you use any other warmer weather beauty products that you would like to recommend?


Happy Spring from Montana,

Pin It

Monday, April 16, 2012

Pants to Shorts Refashion


I have been in a I-can't-believe-how-fast-my-kids-go-through-clothes state of shock these past few weeks.  Summer is approaching, and my kids grew like weeds over the school year.  They are not going to be able to wear very many clothes from last summer.  I've been patching jeans like crazy.  The jeans that are getting too short, I'm converting into capris and shorts.  

I wanted to create some shorts for my daughter that were a little fancier than your average cut-offs.  I was thinking about trying some applique or free motion stitching, but couldn't get inspired.  I had a pack of adhesive stencils sitting on my desk just crying out be utilized, so decided to give 'em a try.  The end product turned out to be much more complicated than I first anticipated, but I had so much fun "playing" that it was like I didn't want the project to end.  Has that ever happened to you?

Check out my latest jeans to shorts conversion:

I added some detail with a fine point sharpie, a totally unnecessary step. 

4 Easy steps:
  1. Cut off pants legs and finish with bias tape.  You can find a good bias tape how-to HERE.
  2. Get a hold of some stencils and paint.  I was very happy with Martha Stewart's adhesive stencil set and multi purpose craft paint.   (The adhesive stencils are the bomb!  I am stoked to get my hands on some more!  Freezer paper stencils would be a great choice as well.  Any acrylic or fabric paint will work.)  
  3. Plan out your design and paint away! (two coats work best)
  4. Let it dry and heat set with your iron. (30 seconds on cotton setting.) 


Yes, I know this is sideways.  Help!


The photo above gives you an idea of how worn the original jeans were.  I didn't really have a plan, I just painted a bit and thought about what to do next while it dried.  Then, I would paint a bit more and plan a bit more.  These shorts will suffice for all the hiking and camping we have planned for the summer.

If you all are reading this during April 2012, please vote for your favorite Typography Challenge project:
Typography Challenge Poll


I'm curious to hear your comments.  What do you think you could do with clothing upgrade idea?

Happy crafting and big hug from Montana,
Pin It

Thursday, April 12, 2012

Painted Patches: A cool project for boys.


When my son was younger, he would grow out of his jeans before he could wear out the knees.  Now that he's older and plays a bit rougher, the knees of his jeans don't stand a chance.

I began repairing the holes with iron-on patches.  After a day at play or one round through the washing machine, the edges of the patches would curl up and my son would pick at them until they fell off completely.  I tried placing the patch on the inside of the knee with similar results.  I tried re-ironing the patches after every washing and adding some fusible webbing under the patches for extra adhesion, but nothing fixed the problem.  The iron-on patches were only a temporary solution, I found.

I knew I had 4 choices:

  1. Leave the holes unpatched.  (My son could care less to be honest.)
  2. Buy new jeans.  (That would feel like giving up.)
  3. Hand sew the edges of the patches.  (I did this once.  Once was enough.)
  4. Figure out how to machine sew the patches.  (OK, you know I chose this one!)
The obvious problem with sewing patches on little boys' jeans is that the legs are so dang narrow you can't slide them over your sewing machine.  The holes are in the middle of the garment so you can't bunch up the fabric enough to avoid sewing through both sides of the pant leg.  That didn't stop me trying though.  Curse words could be heard streaming from my craft room throughout that time.

So here's what I did:
  1. I applied an iron-on patch over the hole.
  2. I ripped open the outer seam (the seam that was not top-stitched) of the pant leg.  I ripped just enough so I could slide the bed of my machine through the opening.
  3. I used a strong top-stitching thread to sew down the patch.  You can see from the photos that I sewed several parallel lines through the patch.  
  4. I turned the pants inside out and sewed up the seam I ripped.
  5. I took a black sharpie and drew some little pictures on the patches.
  6. I used some Martha Stewart Multi-Surface acrylic paint (Mother of Pearl) to enhance the drawings.
  7. After drying and curing overnight, I washed and dried the jeans as I normally would.  You can see the results of the washing in the photos.  
[source]

So what do you think?  Do you know a little boy who could benefit from this project?  I know my daughter is eager to make some holes in her jeans...

If you're reading this post before April 30, 2012, would you please vote for your favorite Typography Challenge project HERE?  Anyone can vote once per day though out April.  The voting page also links to each project and many of them have tutorials.  

Happy crafting and big hugs from Montana,

Pin It

Thursday, April 5, 2012

Egg-Kabobs:a new way to color eggs


Today is our first day of Spring Break!  Today I feel blessed because I'm a SAHM!  If I were working, my kids would be in daycare right now.  Instead, we spent the whole morning having FUN!

Traditionally, we have used the tried and true egg dying kits with the little dye pills and the vinegar.  But this year we really stepped outside our boxes and tried something completely different.  The first major change we made was to blow out the eggs rather than hard boiling them.  The hard boiled eggs never get eaten anyway.  The empty egg shells are fragile, but we aren't hiding these eggs out in the garden.  We are going to decorate the house with them.  If we're careful, we will be able to keep them forever and add to our collection every year.

Here's how easy it is to blow the insides out of an egg:

  1. Take a safety pin (or a sturdy needle) and poke a hole in the top and bottom points of the each egg.  Chip away at the edges of the holes with the pin to widen the openings.  A 1/8 inch diameter is ideal.
  2. Leaning over a cup or bowl, blow in one hole and the egg will come the other side.  (We're eating quiche tonight for supper!  No waste!)


I took some bamboo skewers through the eggs to make the eggs easier to paint.  I cut some holes in cardboard boxes to set the eggs over for painting.  I got the skewer idea from The Creative Salad.


I squeezed out some acrylic craft paint and the kiddos went to town.  After the paint dried, we painted on a few layers of glitter Mod Podge.  This worked out so much better than real glitter.  The Mod Podge helped strengthen the shells and seal up any cracks that occurred during handling.


See how pretty they turned out!


These photos do not do the eggs justice!  I no photographer so you'll just have to trust me that the finished product is 100 times better than the photos.  The glitter is not just silver--it's holographic.  You can see a rainbow of sparkles as you turn the egg in your hand.  

The eggs are still drying, but we plan to slide them off the skewers and hang them on our Easter tree.


 And what do you do with a box with a hole cut in it?  
Make a rubber band guitar, that's what!


My son is a total ham! 

please don't "pin" this photo!

So that's what we did today!  What did you all do?

Happy crafting and big hugs from Montana,

Wednesday, April 4, 2012

Vote for your Typography Challenge Favorite!


Here's your chance to pick a winner!  Anyone can vote once per day.  The entries in the poll will appear in a different order every time you vote.  So don't tell anyone to "vote for the 3rd one down."  
Be sure to scroll on down past the poll and click on the links for all the projects.  There are a lot of great tutorials and inspirational ideas in those links, so don't pass them up!
Keren and I had a great time with this challenge and hope the participants did as well.
To the participants:
Thanks so much for all your hard work!  You all tackled this challenge with style and such creativity.  It is always so amazing to see how you all can solve the same problem in so many different ways.  Please stay in touch as we'll be announcing our next challenge soon.


  1. Ampersand wall art by Cameron at Homemade
  2. Citrisolv image transfer dishtowels by Jenni at Who Makes Up This Craft?
  3. Create appliqued and quilted pillow by Laura at Quokka Quilts
  4. Fabric letter and number sets by Pam from Threading My Way

5.  Vinyl sticker cuckoo clock by Donatella from Inspiration&Realisation
6.  P.S. I Love You bag by Tanya from Carft Couture by TC

7.  Lacey used applique, stamps and fabric paint to make these napkins.
8.  Applique pillow by Nadia from The Pink Pixie
9.  Embroidered pillow by Keren from sew la vie (challenge hostess)
10.  Table linen set crafted by Paula from Paula Castro Crafts

11.  Reverse applique Molly pillow by Jaime from That's My Letter
12.  Home Sweet Home wall art by Kei from Unfortunately Oh!
13.  Mr. & Mrs. pillows by Rikka from Ricochet and Away!  (challenge hostess)
14.  Typography Challenge Hompage.

Typography Challenge Poll


Tuesday, April 3, 2012

Lacey's Typography Challenge Entry


Lacey from Indiana
Young happily married newlywed who loves all things crafty especially DIY crafts.


Lacey made some nice napkins for the Typography Challenge.  She used applique, stamping, and fabric paint to complete her project.  I think it's a very clever idea and a great conversation piece for dinner parties.


Saturday, March 31, 2012

Remember the Retro Pillow Challenge?


Waaaaay back in September 2011 Keren from sew la vie! and I hosted our first sewing challenge.  We called it the Retro Pillow Challenge.  One of the participants, Miss Lauren from Michigan, was not able to complete her project in time.  It was a major bummer because she had a great idea but just not enough time to get it done.

Lauren is not a blogger, but she has a BurdaStyle profile.  She makes a lot of purses and bags, which is how I found her on BurdaStyle in the first place.  Anyway, many, many months later (little stab there!) Lauren finally finished her pillow.  She sent me some pics and just look at how cool it came out!  I just had to share.


Now I am Little-Miss-Matchy-Matchy-Everything-Must-Be-Symmetrical.  Lauren is not.  Her "eye" for design is much more organic than mine.  Just look how she plotted out her floral applique.  Two huge flowers and neither are centered.  But it all works, doesn't it?


Check out the gorgeous stitching and bead work.  


Well done Lauren!  Thanks so much for sending me the photos and for being such a cool BurdaStyle friend!

What about all of you, my lovely readers?  Do you like Lauren's pillow?  What do you think of her aesthetic?  What is your design style?

Happy crafting and big hugs from Montana,
Pin It
Related Posts Plugin for WordPress, Blogger...