Showing posts with label kids crafts. Show all posts

Friday, March 15, 2013

Plaid Stencils and Folk Art Craft Paint Review


Besides connecting with amazingly creative people from all over the world, the second best thing about being a blogger is getting opportunities to review craft products.  This post is about my experience with FolkArt stencils.  I've been a big fan of Plaid brand products even before I began blogging.  You see, I'm a Mod-Podger from waaaaay back!

These are all my projects featuring Plaid products:

Most of those tutorials feature projects using either Mod Podge or various brands of acrylic craft paint.
Besides the Patches for Girls post, I haven't worked much with stencils...until NOW!

paint, stencils, handmade charlotte, plaid, folk art


Happy crafting and big hugs from Montana,


Connect with Plaid via these social media links:
Plaid on Facebook
Plaid on Twitter
Follow Plaid on Pinterest

Wednesday, December 5, 2012

DIY Foam Ball Ornaments


When I was in Girl Scouts (many years ago!) we hosted an annual Christmas Bazaar for the community to buy & sell their crafts and baked goods.  One year my troop made ornaments to sell.  We started with ready-made satin-covered foam ball ornaments.

Friday, June 22, 2012

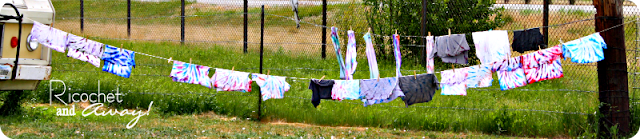
DIY no dye tie dye


I imagine that nearly everyone has tried tie-dying at some point in their life.  It's fun and low-tech and has a cool mysterious element.  I mean, isn't it exciting when you undo all the rubber bands and finally get to see the finished product?   There are many ways to tie-dye and I've tried most of them.  For most methods a sink, washing machine, and dryer are standard pre-requisitions.  But I found a way around all those requirements.  In fact, I can tie-dye without dye.  I've been doing it for over 15 years.  Intrigued?  I hope so!

My family gets together every summer.  To add an extra element of fun to the family reunion, this year we had a theme: The 70s!!!  I know, fun right?  It was a blast!  What comes to mind when you think about the 1970s?  Disco?  Mod?  Bell-bottom pants?  Tube socks? Half shirts on men?  Short shorts?  Leisure suits?  Wedge high heels?  Newsboy hats?  Sock it to me?  Fringed vests?  Headbands?  Chokers?  Well, nearly every single one of those elements were seen at my family reunion.  My contribution: tie-dye t-shirts for all the kids!  Maybe tie-dying is a bit more 60s in your mind, but I looked it up and those hippies were tie-dying well into the 1970s.  (psst!  I was born in 1977 so I don't recall too much tie-dying...)

Anywhoo, here's what you need to use the Ricochet Method of Tie-Dye:
Everything but the paint can found at your local dollar store.
  1. T-shirts.  For most dyes, you would need 100% cotton for best results, but any fabric will work for this method.  I got all my white t-shirts from the dollar stores.  I even got some grey t-shirts and they worked as well.
  2. Water.  A bucket will do.  No sinks required.  I used a horse trough.  ;-)
  3. Rubber bands.  I got 2 bags of assorted rubber bands from the dollar store and had way more than I needed to tie up 28 t-shirts and several pairs of tube socks.
  4. Spray bottles.  I got mine from the dollar store as well.  This item is actually optional because you could really just pour the color onto the t-shirts or use paint brushes.  The spray bottles are good for kids though.  
  5. Acrylic paint.  Not tempura, oils, or watercolors.  I used Apple Barrel brand acrylic craft paints.  They are very inexpensive and come in virtually every color.  
[source]
There are lots of ways to tie up your t-shirts to prep them for color.  I like the following method because it creates lots of wrinkles to catch and resist the color, it's faster than creating the concentric-bulls-eye with rubber bands, and the front and back match.  You could also create lots of stripey wrinkles by simply using an accordion fold, but here's how I do it to create a traditional spiral design:
  1. I like to start with a damp t-shirt.
  2. Pinch the middle of the shirt, grabbing all the layers of fabric and start twisting.
  3. Take some time to define the arms of the spiral pattern you are creating.  Just pinch the folds to form lots of deep wrinkles.  
  4. See how it is coming together?
  5. At any point you can add a rubber band to help secure what you've already twisted up.
  6. Keep adding rubber bands and twisting and making wrinkles.
  7. Here's what mine look like after they're all tied up.
  8. Here's the backside.  
  1. Take your acrylic paint and water it down.  There is no perfect ratio of paint to water, sorry.  If you use too much paint, the shirt will be sort of stiff when it dries but your colors will be intense.  Too much water and your colors will be pastel-like.  Experimentation is encouraged!
  2. Put your watered down paint into a spray bottle and saturate your t-shirt with color.
  3. I kinda squish my shirts inside a plastic bag.  In my mind this squeezes more paint into all the wrinkles, but I'm not convinced this step is necessary.
  4. Now that all the paint has been applied, let your shirt sit out in the sun for while to dry.  You don't need to wait for the shirt to dry completely.  You could unwrap it right away, but you'll get your fingers super painty and risk transferring that paint to areas of your shirt that you don't want to get paint.  
  5. Here's what mine looked like after removing the rubber bands.
  6. Then I started to untwist it.
  7. Cool!  Here's the front.
  8. Here's the back.
As soon as the shirt is COMPLETELY dry, you can wear it.  The beauty of acrylic paint is that it is completely non-soluble in water after it dries.  Because I started with a wet shirt, the paint will bleed and continue bleeding into the wet fabric until completely dry.  I can't prove it, but I think if I would have let the shirt dry completely before removing the rubber bands, there would have been less bleeding and a more defined design.  But who wants to wait that long?  Not my 5 year old daughter!  The photo above shows my daughter wearing her dry shirt.  The pic below shows the same shirt after several machine washings.

Here's how we tie-dyed at my family reunion:
  1. I twisted and tied up all the dollar store t-shirts ahead of time.  I prefer to start with a wet shirt and apply the paint right away, but this method worked out OK too.  We just dunked the tied up shirts in a bucket of water and wrung them out as we needed them.  I even used some grey shirts and they turned out Ok as well.  
  2. Here you can see my dollar store spray bottles filled with diluted craft paint.  I had the kids help me add a few squirts of paint to each bottle, add some water, and shake it up to mix.  The tablecloth: a dollar store shower curtain!
  3. Some of our finished t-shirts drying in the sun.  My daughter did the one on the left, my son the center, and you can see the shirt on the right in photo #7.
  4. When my little cousin was spraying the paint on this shirt, I was thinking, "Oh you better stop her or there will be no white left on this shirt."  I just let her spray away though.  Turns out I was wrong.  Her shirt was one of the coolest we saw that day.
  5. Tube socks were fun to tie-dye as well.  The great thing about using acrylic paint is that the socks don't have to be 100% cotton to hold a rich color.
  6. Cute!  As soon as the shirts were completely dry, the kids wore them.  
  7. I like the look of just one color.
  8. Here's where I got the water for this project.  Our redneck swimming pool:  the horse trough!  


Because I am a list-maker, here are some things to keep in mind about tie-dying with acrylic paint:

  • As long as it is not dry, acrylic paint is water soluble.  But once it's dry, it basically turns into a plastic-like substance that will not be diluted with water.  You can look online for ways to remove acrylic paint that has been dried.  I used rubbing alcohol to get wall paint off my hardwood floors.
  • If the paint dries on you skin, it will rub/scratch off under water.  It's harder to remove the paint from under your nails and around your cuticles, but it won't stain your skin.  
  • If your finished, dried t-shirt is super stiff, don't freak out until you've put it through the washer and used some fabric softener.  The combination of the paint and hard water can make the shirt pretty stiff.  If your shirt is still pretty stiff after washing, then you know you didn't water down your paint enough.  
  • If you were to use a more expensive brand of acrylic paint, something like Golden that comes in tubes, your paint will have more bang for the buck.  Fine quality acrylic paint has a high pigment content compared to "craft paints".  I didn't have a blue Apple Barrel craft paint, so I used my Golden brand phthalo blue.  The result was a bright and beautiful blue.  
  • One really cool thing about this method is that you can utilize white paint on dark colored fabric.  Think about it.  :-)
Have you ever tie-dyed?  How did it turn out?  Would you be willing to try out this method?

Happy crafting and big hugs from Montana,

Monday, April 16, 2012

Pants to Shorts Refashion


I have been in a I-can't-believe-how-fast-my-kids-go-through-clothes state of shock these past few weeks.  Summer is approaching, and my kids grew like weeds over the school year.  They are not going to be able to wear very many clothes from last summer.  I've been patching jeans like crazy.  The jeans that are getting too short, I'm converting into capris and shorts.  

I wanted to create some shorts for my daughter that were a little fancier than your average cut-offs.  I was thinking about trying some applique or free motion stitching, but couldn't get inspired.  I had a pack of adhesive stencils sitting on my desk just crying out be utilized, so decided to give 'em a try.  The end product turned out to be much more complicated than I first anticipated, but I had so much fun "playing" that it was like I didn't want the project to end.  Has that ever happened to you?

Check out my latest jeans to shorts conversion:

I added some detail with a fine point sharpie, a totally unnecessary step. 

4 Easy steps:
  1. Cut off pants legs and finish with bias tape.  You can find a good bias tape how-to HERE.
  2. Get a hold of some stencils and paint.  I was very happy with Martha Stewart's adhesive stencil set and multi purpose craft paint.   (The adhesive stencils are the bomb!  I am stoked to get my hands on some more!  Freezer paper stencils would be a great choice as well.  Any acrylic or fabric paint will work.)  
  3. Plan out your design and paint away! (two coats work best)
  4. Let it dry and heat set with your iron. (30 seconds on cotton setting.) 


Yes, I know this is sideways.  Help!


The photo above gives you an idea of how worn the original jeans were.  I didn't really have a plan, I just painted a bit and thought about what to do next while it dried.  Then, I would paint a bit more and plan a bit more.  These shorts will suffice for all the hiking and camping we have planned for the summer.

If you all are reading this during April 2012, please vote for your favorite Typography Challenge project:
Typography Challenge Poll


I'm curious to hear your comments.  What do you think you could do with clothing upgrade idea?

Happy crafting and big hug from Montana,
Pin It

Thursday, April 12, 2012

Painted Patches: A cool project for boys.


When my son was younger, he would grow out of his jeans before he could wear out the knees.  Now that he's older and plays a bit rougher, the knees of his jeans don't stand a chance.

I began repairing the holes with iron-on patches.  After a day at play or one round through the washing machine, the edges of the patches would curl up and my son would pick at them until they fell off completely.  I tried placing the patch on the inside of the knee with similar results.  I tried re-ironing the patches after every washing and adding some fusible webbing under the patches for extra adhesion, but nothing fixed the problem.  The iron-on patches were only a temporary solution, I found.

I knew I had 4 choices:

  1. Leave the holes unpatched.  (My son could care less to be honest.)
  2. Buy new jeans.  (That would feel like giving up.)
  3. Hand sew the edges of the patches.  (I did this once.  Once was enough.)
  4. Figure out how to machine sew the patches.  (OK, you know I chose this one!)
The obvious problem with sewing patches on little boys' jeans is that the legs are so dang narrow you can't slide them over your sewing machine.  The holes are in the middle of the garment so you can't bunch up the fabric enough to avoid sewing through both sides of the pant leg.  That didn't stop me trying though.  Curse words could be heard streaming from my craft room throughout that time.

So here's what I did:
  1. I applied an iron-on patch over the hole.
  2. I ripped open the outer seam (the seam that was not top-stitched) of the pant leg.  I ripped just enough so I could slide the bed of my machine through the opening.
  3. I used a strong top-stitching thread to sew down the patch.  You can see from the photos that I sewed several parallel lines through the patch.  
  4. I turned the pants inside out and sewed up the seam I ripped.
  5. I took a black sharpie and drew some little pictures on the patches.
  6. I used some Martha Stewart Multi-Surface acrylic paint (Mother of Pearl) to enhance the drawings.
  7. After drying and curing overnight, I washed and dried the jeans as I normally would.  You can see the results of the washing in the photos.  
[source]

So what do you think?  Do you know a little boy who could benefit from this project?  I know my daughter is eager to make some holes in her jeans...

If you're reading this post before April 30, 2012, would you please vote for your favorite Typography Challenge project HERE?  Anyone can vote once per day though out April.  The voting page also links to each project and many of them have tutorials.  

Happy crafting and big hugs from Montana,
Pin It

Thursday, April 5, 2012

Egg-Kabobs:a new way to color eggs


Today is our first day of Spring Break!  Today I feel blessed because I'm a SAHM!  If I were working, my kids would be in daycare right now.  Instead, we spent the whole morning having FUN!

Traditionally, we have used the tried and true egg dying kits with the little dye pills and the vinegar.  But this year we really stepped outside our boxes and tried something completely different.  The first major change we made was to blow out the eggs rather than hard boiling them.  The hard boiled eggs never get eaten anyway.  The empty egg shells are fragile, but we aren't hiding these eggs out in the garden.  We are going to decorate the house with them.  If we're careful, we will be able to keep them forever and add to our collection every year.

Here's how easy it is to blow the insides out of an egg:

  1. Take a safety pin (or a sturdy needle) and poke a hole in the top and bottom points of the each egg.  Chip away at the edges of the holes with the pin to widen the openings.  A 1/8 inch diameter is ideal.
  2. Leaning over a cup or bowl, blow in one hole and the egg will come the other side.  (We're eating quiche tonight for supper!  No waste!)


I took some bamboo skewers through the eggs to make the eggs easier to paint.  I cut some holes in cardboard boxes to set the eggs over for painting.  I got the skewer idea from The Creative Salad.


I squeezed out some acrylic craft paint and the kiddos went to town.  After the paint dried, we painted on a few layers of glitter Mod Podge.  This worked out so much better than real glitter.  The Mod Podge helped strengthen the shells and seal up any cracks that occurred during handling.


See how pretty they turned out!


These photos do not do the eggs justice!  I no photographer so you'll just have to trust me that the finished product is 100 times better than the photos.  The glitter is not just silver--it's holographic.  You can see a rainbow of sparkles as you turn the egg in your hand.  

The eggs are still drying, but we plan to slide them off the skewers and hang them on our Easter tree.


 And what do you do with a box with a hole cut in it?  
Make a rubber band guitar, that's what!


My son is a total ham! 

please don't "pin" this photo!

So that's what we did today!  What did you all do?

Happy crafting and big hugs from Montana,
Related Posts Plugin for WordPress, Blogger...